PineNote Development/Flashing
Please help to review and edit this page or section. Information are subject to change.
This page contains information on flashing software to the PineNote. The general process is as follows:
- Take a backup of all important data on the PineNote
- Modify the partition layout to make space for your desired Linux distribution
- Instantiate a root filesystem (rootfs) in the new partition space
- Install your Linux distribution to the boot partition
- Modify the boot process to boot the Linux distribution by default
There are multiple possible methods of executing these steps, and this page attempts to document all of them. You can use:
rkdeveloptool, a command line utility for modifying Rockchip devices over USB- The UART shell
- Android Debug Bridge
- Fastboot
Getting rkdeveloptool
Most flashing operations on the PineNote are done through rkdeveloptool, a command line utility built on libusb.
PINE64 maintains its own fork here that you will need to get.
The repo's README contains a list of dependencies (libusb 1.0) and instructions for building the tool.
Installing (not just building) rkdeveloptool will configure PAM to elevate privileges where necessary on your system; you can configure this manually as follows:
sudo cp 99-rk-rockusb.rules /etc/udev/rules.d/
sudo udevadm control --reload
Entering Maskrom/Rockusb mode
Interfacing with the PineNote over USB using rkdeveloptool requires first booting the PineNote into an alternative operating mode called Maskrom or Rockusb mode.
Possible methods
There are three possible methods of entering Maskrom/Rockusb mode:
Hardware magnet switch
- Connect the PineNote to your computer via USB and boot the PineNote into Android
- Locate & identify the small circular marking on the back of the PineNote, in the top right quadrant; have the PineNote pen close at hand, or any other small magnet
- Hold the PineNote power button to bring up the reboot/shutdown menu; select reboot, then place the PineNote face down with the "eraser" end of the pen (or your magnet) resting on the small circular marking
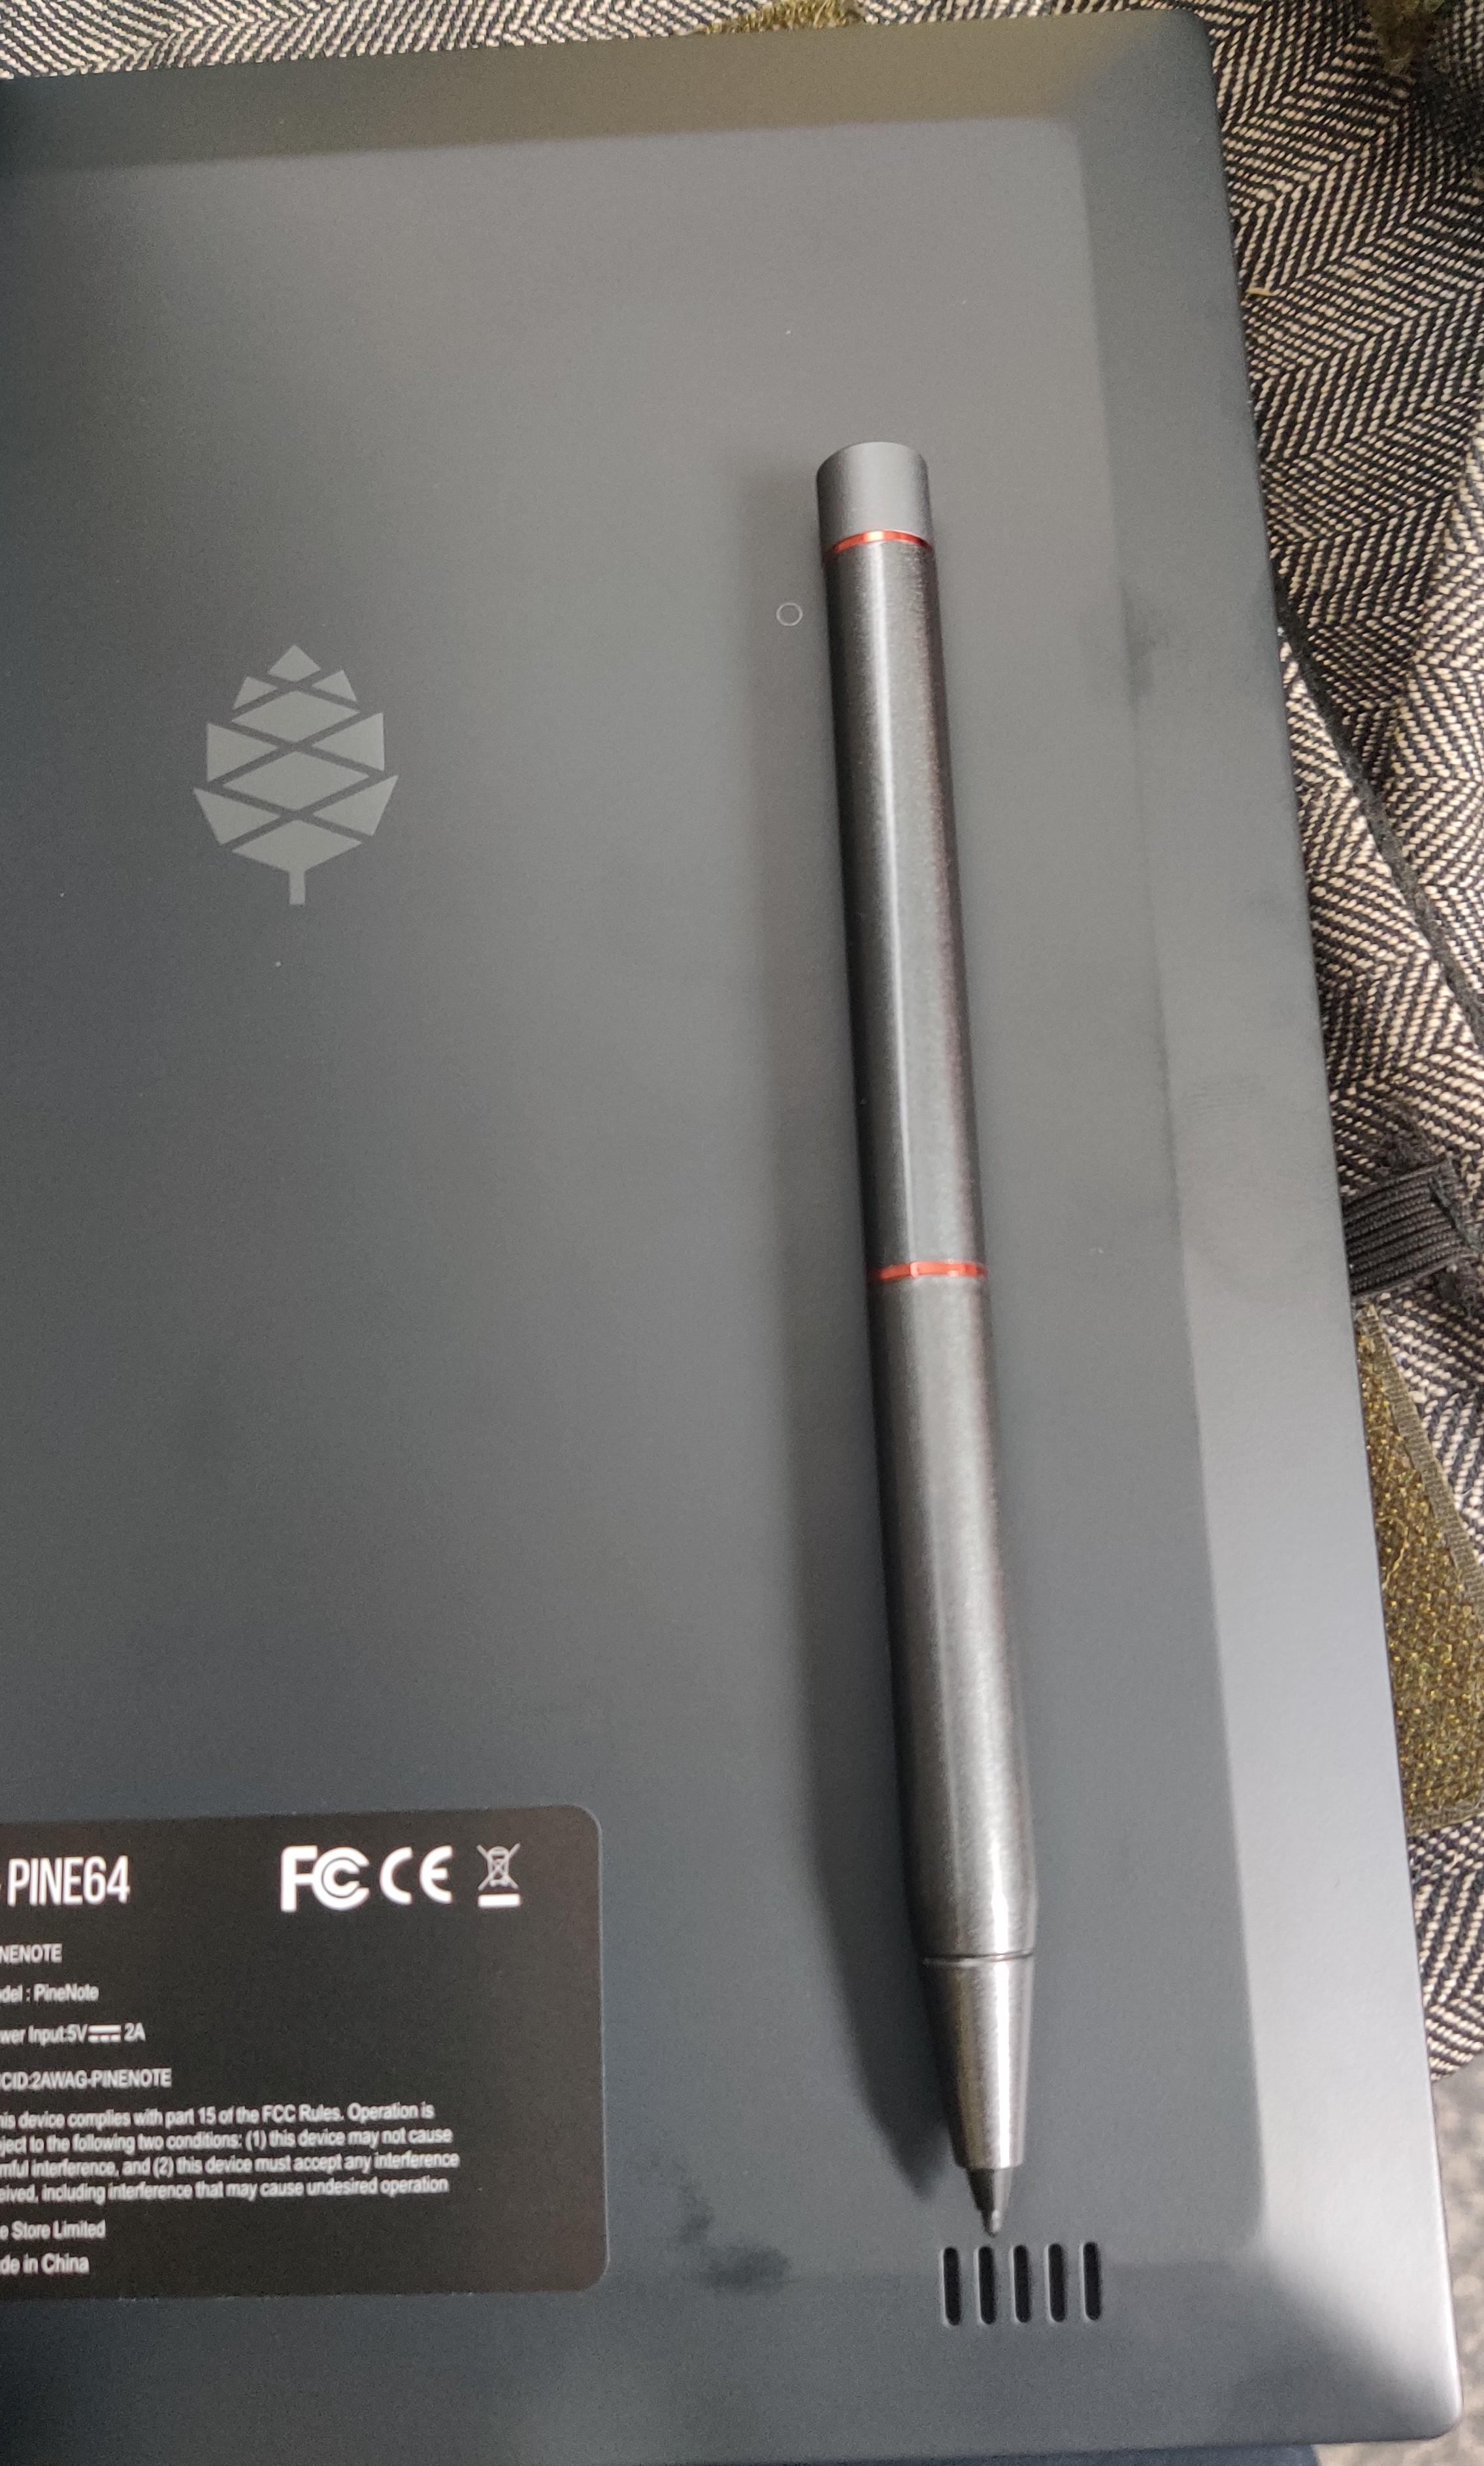
Pen method
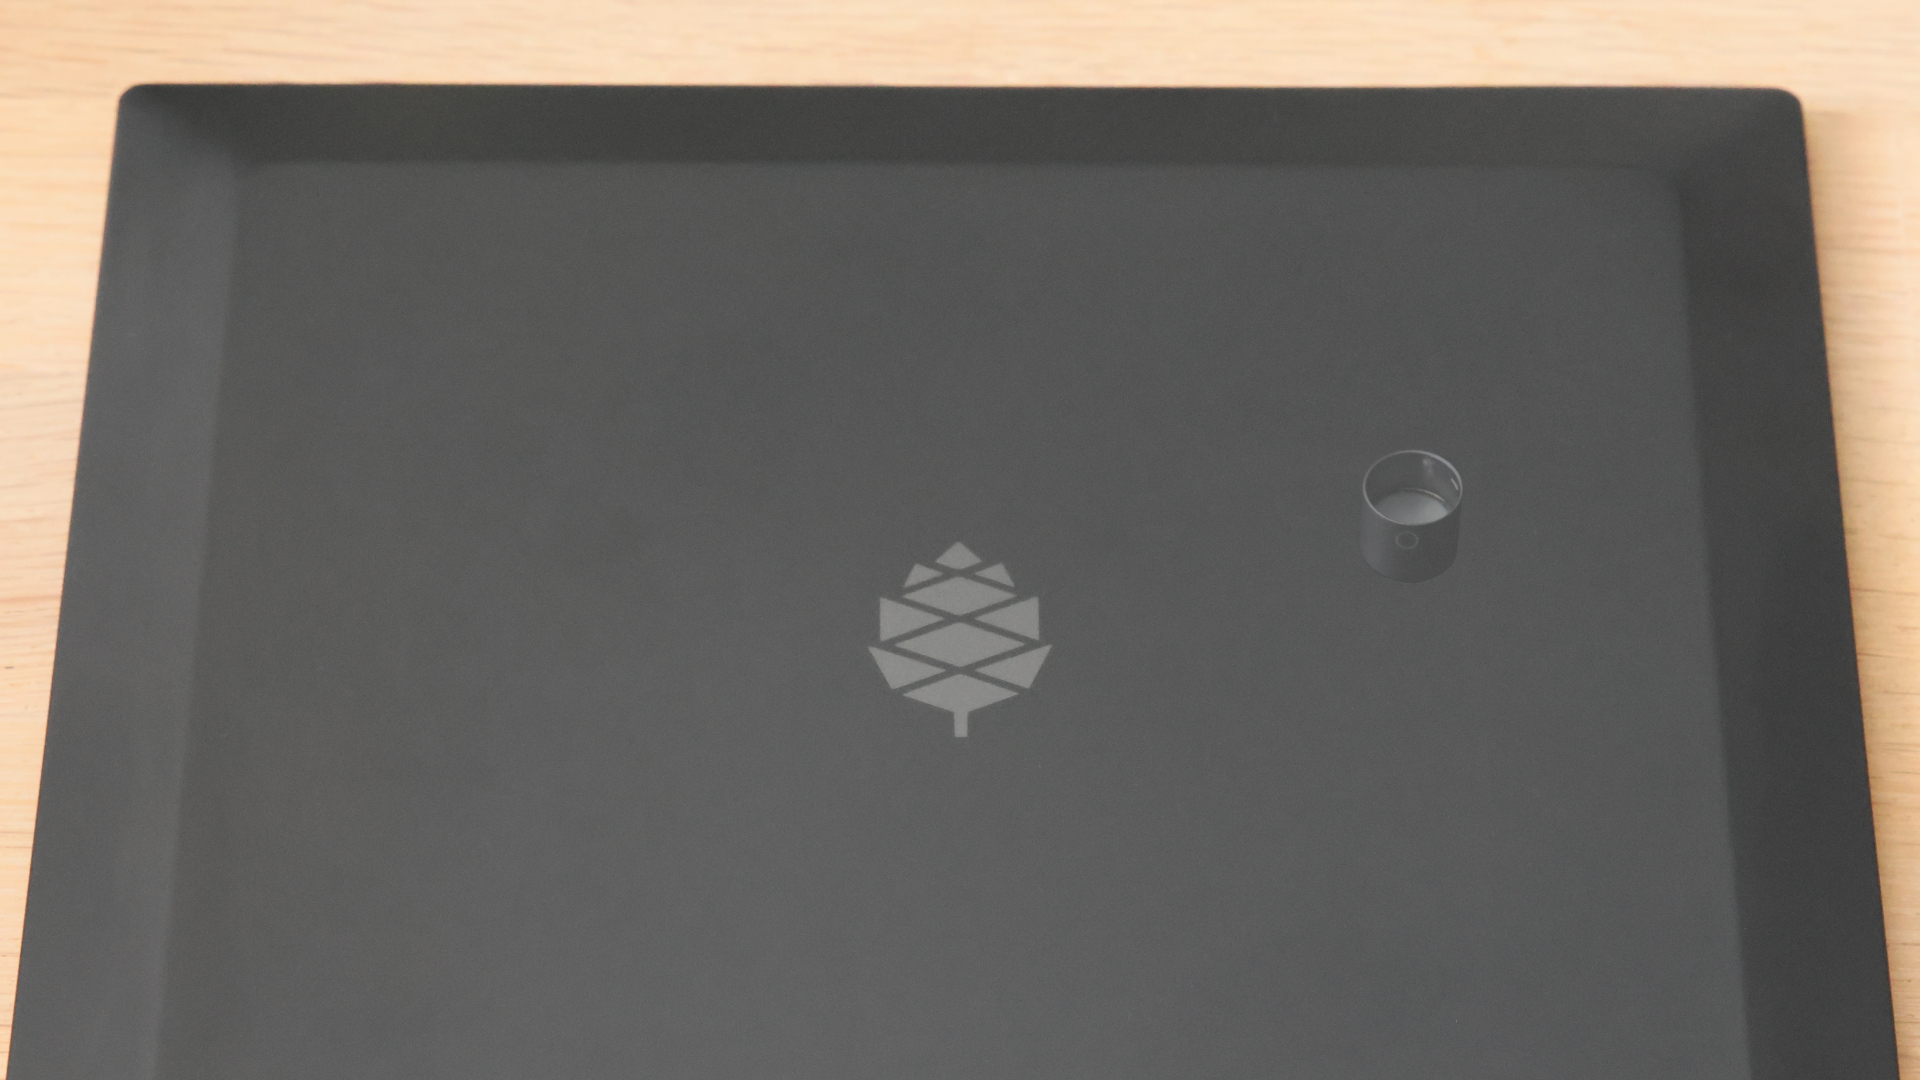
Magnet method


U-Boot terminal
This method requires a UART dongle with passthrough allowing simultaneous UART & USB connections. It is nice because you can easily switch back & forth between U-Boot and Rockusb without having to physically manipulate the PineNote or its connectors; this is especially helpful when trying to develop U-Boot.
- Connect to the PineNote via UART and USB simultaneously
- Interrupt the U-Boot startup using
ctrl+csent over UART - In the U-Boot terminal over UART, run
rockusb 0 mmc 0
The UART terminal should print RKUSB then a spinner will appear.
You can exit back to the U-Boot terminal by sending ctrl+c again.
Shorting test points
If the bootloader is broken/corrupted, you cannot get to Maskrom without opening up the device (it can be opened using spudger and a bit of patience).
Once inside, short TP1301 (GND) and TP1302 (eMMC_D0/FLASH_D0) with a small tweezers, this is how it looks on board view (credit to Caleb):

Success
No matter what approach you take, you can tell whether you succeeded by running the lsusb command on your computer:
- If you find the entry
2207:0018 Fuzhou Rockchip Electronics Company rk3566_einkin the list, the process did not succeed; reboot and retry - The entry
2207:350a Fuzhou Rockchip Electronics Companywill occur if you detach then reattach the USB-C cable while the PineNote is in Maskrom/Rockusb mode;rkdeveloptoolwon't work and you will have to do a hard reboot (hold down power button for 30 seconds to shutdown) - If you find the entry
2207:350a Fuzhou Rockchip Electronics Company USB download gadgetthen the process succeeded
You can also look at the output of the rkdeveloptool list command:
- If this prints out
No devices in rockusb mode foundthe process did not succeed; reboot and retry - If this prints out
DevNo=1 Vid=0x2207,Pid=0x350a,LocationID=305 Maskromthen you probably detached/reattached the USB-C cable while in Maskrom/Rockusb mode andrkdeveloptoolwon't work; perform a hard reboot to fix - If this prints out
DevNo=1 Vid=0x2207,Pid=0x350a,LocationID=303 Loaderthen the process succeeded
Exiting
You can boot the PineNote back into its normal mode of operation by powercycling the PineNote with its hardware power switch, or running the rkdeveloptool reboot command.
If you used the magnetic switch method be sure to remove the pen/magnet before rebooting.
Backup
A backup of the content of the internal eMMC before anything gets messed up is mandatory.
Especially the waveform partition contains data unique to your PineNote and is a prime candidate for backup.
Other partitions like U-Boot (need for any operation of the device) or the un-partitioned space at the beginning containing the GPT partition table (and presumably the VCOM setting for the e-ink display and maybe device mac addresses) contain data you may also wish to backup.
Depending of your personal level of data hoarder you may want to backup more than this or even just everything (the large userdata partition is supposed to be able to be repopulated as empty space by Android)
In any case it is easier to restore/extract data from a backup than not having one if you need one.
This process was developed by Dorian Rudolph, originally described here.
List partitions
First, run rkdeveloptool list-partitions to print out your PineNote's partitions to get an idea of what you're dealing with.
The stock PineNote has a fairly standard Android partition setup:
| Number | Name | Size | Purpose |
|---|---|---|---|
| 0 | uboot | 4 MB | The U-Boot embedded systems bootloader |
| 1 | trust | 4 MB | Secrets that can be encrypted with a key stored in the TPM |
| 2 | waveform | 2 MB | Important files controlling the e-ink screen's state changes |
| 3 | misc | 4 MB | Data used by the recovery partition |
| 4 | dtbo | 4 MB | Device Tree Blob for Overlay, files describing the PineNote's hardware configuration |
| 5 | vbmeta | 1 MB | Data required for verified boot |
| 6 | boot | 42 MB | The kernel image & ramdisk to boot |
| 7 | security | 4 MB | |
| 8 | recovery | 134 MB | The recovery image, booted during Android updates |
| 9 | backup | 400 MB | |
| 10 | cache | 1 GB | Stores temporary data; can be used to install a minimal Linux distribution! |
| 11 | metadata | 17 MB | Used for disk encryption |
| 12 | super | 3.25 GB | Android itself is installed here |
| 13 | logo | 17 MB | Splash image displayed during boot |
| 14 | device | 67 MB | |
| 15 | userdata | 119 GB | The big one; user-installed Android apps and files live here |
Patch U-Boot
Before we can back up our partitions, we have a problem to solve.
The version of U-Boot installed on the stock PineNote contains a bug where it can't dump partitions beyond 32 MB (above that limit all bytes in the dump are just 0xCC), meaning the PineNote must be flashed with a fixed version of U-Boot before it is possible to take a backup of the larger partitions.
It is possible to extract and modify the U-Boot image from your PineNote if you're interested in some light reverse-engineering (following Dorian's notes), or you can simply download a patched U-Boot image directly here.
Once you've acquired a patched U-Boot image, run:
rkdeveloptool read-partition uboot uboot_backup.imgrkdeveloptool write-partition uboot uboot_patched.imgrkdeveloptool reboot
Taking the backup
With U-Boot patched, you can back up every partition except for super and userdata; run:
rkdeveloptool read-partition partition_name partition_name_backup.img
Unfortunately the super and userdata partitions run into a second limitation preventing dumping partitions larger than 2 GB, this time originating in rkdeveloptool itself.
This means if you have a large number of documents in the Android userdata partition they might not all make it into the backup.
If you don't have many documents (or don't care about losing them) this should not be a problem.
If you do have a lot of documents, workarounds include:
- A possible patch written by Thomas exists here but has not yet been upstreamed; consider investigating how to get the patch tested & upstreamed, or just apply it to your own local copy of
rkdeveloptool - Use this Python script written by Visti Andresen (talpadk) to automatically backup your entire partition by splitting reads into 2 GB chunks
See instructions on this artifact. It will instruct you on extracting the rootfs into an empty ext4 partition. This can be done from Linux or Android. Further instructions on building your own rootfs can be found here.
Using a user installed Linux
A Linux installed to the cache partition should be able to easily backup everything over WiFi or to a USB stick/disk using dd.
However the user would need to backup the cache partition themself (if they want that).
And more importantly they would only be getting the backup after they started playing with the content of the eMMC.
Side-by-side setup
It is possible to set up a partition for mainline development without disturbing the factory Android installation. This allows updating a mainline kernel, DTB, and initramfs over Wi-Fi until WiFi or USB OTG is working in mainline Linux.
Without Repartitioning
The recommended partition for this is mmcblk0p11 aka /cache. It is large and already formatted as ext4, so it is readable from U-Boot. Here are some general steps:
- From the UART or adb shell, set up your chroot in /cache. I used the Alpine Linux rootfs tarball.
- Copy in your kernel and DTB, using for example scp or wget inside the chroot.
- Finally, create and boot an
extlinux.confas described below.
With Repartitioning
It is possible to shrink the userdata partition, and create a new partition at the end for use with mainline Linux. This provides much more space than cache. However, because userdata is formatted with f2fs, and that filesystem cannot be shrunk, resizing the partition requires wiping userdata.
- Back up any necessary files from userdata
- Boot to a mainline kernel from mmcblk0p11, either using that partition as rootfs (see above), or using an initramfs with repartitioning tools
- Modify the partition table with your favorite tool, e.g. fdisk, gdisk, or parted
- Reboot into fastboot and wipe userdata.
- Reboot into Android, where you can now chroot in and install your favorite distribution to the new partition.
Using rkdeveloptool
Building Downstream U-Boot
While in maskrom mode, we need to have a u-boot to download onto the device for any of the other commands to work. To build you'll also need to install device-tree-compiler.
You also need to install Python and pyelftools.
Note that rkbin is a >5GB download! This will take some time to clone and process the deltas.
git clone -b quartz64 https://gitlab.com/pgwipeout/u-boot-rockchip.git
git clone -b rkbin https://github.com/JeffyCN/rockchip_mirrors.git rkbin
cd u-boot-rockchip
# If using Arch Linux, export CROSS_COMPILE=aarch64-linux-gnu-
export CROSS_COMPILE=aarch64-none-linux-gnu-
make rk3566-quartz64_defconfig
./make.sh
In the current version (current as of 2022-01-02), there might have to be made a change to one line to get a clean compilation:
diff --git a/lib/avb/libavb/avb_slot_verify.c b/lib/avb/libavb/avb_slot_verify.c
index 123701fc3b..64a1ce6450 100644
--- a/lib/avb/libavb/avb_slot_verify.c
+++ b/lib/avb/libavb/avb_slot_verify.c
@@ -296,7 +296,7 @@ static AvbSlotVerifyResult load_and_verify_hash_partition(
   bool image_preloaded = false;
   uint8_t* digest;
   size_t digest_len;
-  const char* found;
+  const char* found = NULL;
   uint64_t image_size;
   size_t expected_digest_len = 0;
   uint8_t expected_digest_buf[AVB_SHA512_DIGEST_SIZE];
For systems where the global python executable points to python2, compilation fails with an error related to pyelftools not being installed (even if it is). To fix this:
diff --git a/make.sh b/make.sh
index 2bba05b4e4..cfe5b0afd5 100755
--- a/make.sh
+++ b/make.sh
@@ -758,7 +758,7 @@ function pack_fit_image()
        fi

        if [ "${ARM64_TRUSTZONE}" == "y" ]; then
-               if ! python -c "import elftools" ; then
+               if ! python3 -c "import elftools" ; then
                        echo "ERROR: No python 'pyelftools', please: pip install pyelftools"
                        exit 1
                fi
You can now download u-boot onto the PineNote:
./rkdeveloptool boot ../u-boot-rockchip/rk356x_spl_loader_v1.08.111.bin
This should output "Downloading bootloader succeeded".
We can now verify that this worked using e.g. the "read flash info" command:
./rkdeveloptool read-flash-info
Creating a mainline boot image
You can create a filesystem image that replaces the Android boot or recovery partition by doing roughly the following:
- Erase boot and dtbo with rkdeveloptool or fastboot (back them up first!!!)
- Create an ext2 partition image and mount it (fallocate, mkfs.ext2)
- Build your mainline kernel
- Copy the kernel, dtb and an initramfs to the root of the mounted image (use any old postmarketOS initramfs)
- Create a file in the root of the mounted image called
extlinux.confas described below - Unmount the image and then use rkdeveloptool to flash it to the "recovery" partition on the pinenote (it's about the right size until we get around to replacing the partition layout).
Using fastboot
Follow the steps for Creating a mainline boot image, but instead of flashing it with rkdeveloptool, use fastboot. You can enter fastboot in either of two ways:
- Use "reboot bootloader" from adb or a UART console or
- get a U-Boot prompt and run
fastboot usb 0.