Difference between revisions of "Pinecil"
| Line 560: | Line 560: | ||
# [[Pinecil:_How_to_Repair#Assembly_steps| Assembly steps]] | # [[Pinecil:_How_to_Repair#Assembly_steps| Assembly steps]] | ||
# [[Pinecil:_How_to_Repair#Diagnosis_&_Testing| Diagnosis & Testing]] | # [[Pinecil:_How_to_Repair#Diagnosis_&_Testing| Diagnosis & Testing]] | ||
# [[Pinecil:_How_to_Repair# | # [[Pinecil:_How_to_Repair#Pinecil_V1,_24V_Mod| Pinecil V1, 24V mod]] | ||
== Pinecil in the Media == | == Pinecil in the Media == | ||
Revision as of 03:52, 19 February 2023
Pinecil is a portable soldering iron with computer controlled temperature, sleep modes, motion detection, and allows many options for power from AC supplies (USB-C, DC Barrel) to external tool/lipo batteries. You may already have a power supply that works. It also has the intended use of being a RISC-V development device using a breakout board. The Pinecil has evolved over the years from a 60W device into the latest rendition, the V2, which supports 24V/88W and includes the new Pine64 designed shorter tip.
Note: Other irons only care if they can solder. The Pinecil is held to an additional standard; how well can it meet the needs of the open source community as a RISC-V development tool. It includes hardware features not found on other soldering irons in order to support FOSS community feature requests for both fun and science.
![]()

Main features
- Portability and Temperature control
- Soldering tips:
- Replaceable and low cost
- Many styles: Currently sold as 2 separate sets of 4, one fine set, the other larger.
- Compatible with other ts100 tips.
- Multiple power sources will work for more flexibility:
- USB-C PD (power delivery), minimum 3 Amps, 12V.
- DC 5525 Barrel jack charger, minimum 3 Amps, 12V.
- Battery: connect to 18V-21V Lithium-ion tool batteries or 3S/4S/5S LiPo batteries.
- Pinecil V2 has a BL706 chip, see batch changes below.
- Board schematics are open. Software is open. Create your own!
- Pinecil breakout board lets you use JTAG, GPIO, A2D, SPI, and more.
Additional features (useful for devkit):
- Programmable Risc-V BL706 embedded processor
- V2 model allows BLE bluetooth control because of the switch to the Bouffalo BL706 MCU.
- 0.69" Monochrome Display that can render text or graphics
- Support for Idle detection, sleep mode of tip, automatic shut-down
- Programmable with tools from Bouffalo Labs, HomeBrew or Linux RISC-V.
Authenticity
There are no PINE64 Pinecils sold on AliExpress. They are not made by PINE64. There are no authorized resellers on AliExpress. Some manufacturer has copied the PINE64 company name, trademark and Pinecone logo and is selling a product made to look like Pinecil through many store fronts, but it is not an authentic. They use a different type of box, i.e., a blue or red box. They are fake copies and do not go through the same quality control as Pine64. It is unclear what type of chips or poor quality cloned chips are used in them. They are not recommended. Genuine Pine64 Pinecil only comes in a black handle color with a silicone thumb grip. The original V1 always came in a black box. This model was discontinued and has not been made or sold by PINE64 or authorized resellers since July 2022.
The current official Pinecil (a.k.a. V2 model) comes in a white box (see Pictures), it has a black color handle with a green silicone thumb grip. If you receive anything that has the PINE64 brand name and Pinecone and does not look like described, it is a fake copy that was not made or authorized by PINE64 or the Pine Store Ltd (see Authenticity Checker below, all real PINE64 Pinecils purchased after Aug. 2, 2022 should pass the checker if they are genuine).
Pinecil V2 Authenticity Checker
Pinecil V2 comes with a unique internal ID/Serial number. This allows people to check if the Pinecil V2 is Authentic. To be more sure, update to the newest stable Ralim's IronOS and check again, see Firmware.
Where to buy a Pinecil
PINE64 Official Stores
- Main global PINE64 store (ships from China, exports only, Global, VAT not included).
- Amazon-USA official pine64 store (ships from USA, only has Pinecil V2 - no tips)
PINE64 EU
- PINE64 EU store (ships from EU, VAT+ 2-year warranty included per EU laws)
Affiliates
- AmeriDroid (offers pre-order, ships to USA/Global/Brazil)
- Eleshop.eu (ships from EU, offers pre-order, 2-year warranty included per EU laws). In Netherlands, use this NL link.
- Droneit (ships from Sweden, sells all Pine tips/accessories).
- Keycapsss (ships from Germany to EU/AUS/Global)
- Testclips (ships from GB)
- Typeractive.xyz (Ships from US)
- URS Electronics (local in-store only sales in Portland, Oregon, USA)
- bitcompact (ships from Canada)
In July 2022, all final stock sold out of PINE64 Pinecil V1 (with GD32VF103 MCU) at the Pine Store & all resellers. There are zero new authentic Pinecil V1 sold in the world after July 2022. Pinecil V1 was made in a black color with a light blue finger grip. PINE64 never made an all-blue Pinecil, and never used blue or red color boxes (those are fake copies with fake PINE64 logos and Pinecone).
Starting Aug. 2, 2022, only the new Pinecil V2 model with the new BL706 BLE bluetooth MCU are made by PINE64 and sold at all authentic resellers. They are black with a green finger grip (see photos in the Picture section). The new model has anti-counterfeiting features. Authentic Pinecil using the newest official Github IronOS firmware, will successfully pass the Authenticiy Checker website. If a new Pinecil (post Aug. 2022) does not have a BL706 chip, then it is a fake counterfeit. If the AliExpress seller tries to show "CE certification" documents as some type of proof, those are all copied public info from this Wiki page in the Certifications section. PINE64 publishes those as they are the CE/FCC certifications for the stamps on the Pinecil. They are not proof of purchase from the Pine Store Ltd.
Shipping & Tracking
See the Pinecil Shipping and Tracking article, which includes:
Usage
Overview
Prep Tasks
Wipe new tips with isopropyl alcohol IPA to remove factory residue before installing. If you have none, try to wipe it down with a dry clean towel, especially the 2 contacts at the cold end (water is not recommended as it can get into the seam on the white end).
Do not try to bend the two internal contacts, they are made of a thin stiff spring metal and could break (not soft copper), but you could wipe them with IPA (including the small PCB pad below the contacts).
1. Install the tip: The Pinecil comes with a separate heating element, the tip.
- Remove the screw from the front top-side of handle. Then, gently push the tip all the way back until the wide collar/guard is touching the front of the plastic (see photo).
- Gently tighten or loosen this screw to install or swap the tip. (careful, tiny screws break easy, if tip does not fall out, it's tight enough)
- The bottom front screw should not touch the tip, it only holds the handle together (see Fasteners).
- Always unplug before swapping tips if you have multiple tips.
2. Supply power: the USB-C port, connected to any supply, is enough power to show the display screen, but not necessarily enough to heat the tip.
- USB port at 5 volts (i.e., laptop) shows DC Low, this is enough for firmware updates and to view the menu, but not to run the soldering iron.
- See Power section for details on power options. QC 12V phone chargers will not work, too weak
3. Heat the tip: plug Pinecil into an appropriate power supply.
- Clicking
[+]starts the tip heating. - The detailed display option shows power draw, current temperature, supply voltage, and time until sleep mode starts.
- Adjust the target temperature with further clicks of
[+]and[-]buttons. - Wait a few seconds for the regular display to return, then hold down
[-]for a moment to turn the heat off. - You can observe the temperature measurement go up and down. Certain settings involve holding down both buttons (see Github IronOS for details on firmware settings).
4. Using the Settings Menu:
- To check the firmware version, hold down the
[-]button. It will display something like "v2.19.A3BBABC 13-07-22". This is the firmware number and release date, the date is July 13, 2022 in the example. - Clicking
[-]when heat is off steps through main categories menus to control a variety of settings, see Getting started with menus section. - Clicking
[-]also returns to the regular display of temperature and supply voltage (this view varies if you activate detailed idle). At other times it may show power draw. - Click
[-]to scroll to the the main menu section desired (i.e., User Interface). Then Click[+]button to change various internal settings. Then click[-]again to go to the next item in the sub-menu.
5. Important notes:
- The iron will "sleep", switching to a lower temperature, after it has been put down for a short time, and heat up again when it is picked up.
- Calibration of the Tip temperature is usually not necessary and should only be done if the tip is off by +/- 5 °C or temperature is behaving oddly. See instructions to calibrate the tip in the firmware on Github IronOS.
- For Safety, unplug the soldering Iron when not in use or left unattended.
- To heat up the tip, we need a power supply that can provide at least 12V 3A to run. This is the bare minimum. Pinecil will heat slowly at only 12V/3A. To maximize performance, higher Volts/Amps/Watts is recommended (see Pinecil Power Supplies).
- Option 1: a USB-C supply that can negotiate up to such a voltage. For good performance and soldering experience, a USB-C PD65W, 20V, 3+ A charger is recommended (suitable for most users).
- Option 2: a supply with a DC 5525 barrel connector (+ pos center, - neg outside) that supplies anywhere from 12V-21V, 3+ amps (V1 Pinecil) or 12V-24V, 3+ amps (V2 Pinecil).
- Option 3: use a battery, i.e., an 18V-21V tool Battery with a Power Wheels adapter, and a cable to plug into the Pinecil DC5525 barrel jack.
- You may have a suitable supply already that could be used, (see Pinecil Power Supplies).
- While 12V-3A will work, it will not heat the tip as quickly and efficiently as a PD65W-20V Usb-C charger or a higher rated DC barrel charger.
- See warnings about using random DC barrel chargers, not all of them have the correct polarity or DC 5525 style plug and some may be too high of voltage which could damage the Pinecil.
Getting Started with the Menu
- Getting Started Guide in Github/IronOS
- Main Settings Menu: updated list is found in the firmware repository Settings Menu
- Power settings: settings related to power, battery cells, input voltage.
- Soldering settings: settings for soldering such as, boost temps, increments for temperature change
- Sleep mode: power & tip saving, such as sleep mode, sleep temperature, and shutdown modes, motion sensitivity
- User interface: settings such as, units C/F, display orientation, button reversal, animation speed, brightness, boot logo duration
- Advanced settings: assorted catchall for settings that don't fit elsewhere or settings that require some thought before use. Restore default/factory settings is here. It will not change the firmware version, but rather resets the menu back to IronOS defaults. This is good to do after a major firmware update as settings may have been altered and need to be re-selected/customized again to work as expected.
- Hidden Debug Menus: also available, see GitHub/IronOS
Optional Advanced Modifications
- Hall Effect Sensor add a sensor that activates with a magnet to put pinecil to sleep when it enters a holder or stand.
- LED light install: add two LEDs to Pinecil.
- LED light ring install: add a PCB light ring to Pinecil.
Live Community Chat
- Need troubleshooting advice for the PINE64 Pinecil soldering iron? Join through one of the Community Chat links below.
- Note: the live chat is bridged to Discord, Telegram, Matrix and IRC. Those bridges will not have all the features available within all platforms, but the chat is relayed between all four.
- Live chat has volunteer members that are not paid PINE64 employees, but occasionally get official information.
- The pinecil channel is the most popular for questions and troubleshooting such as help installing Firmware or use of Tips (and where most people discuss pinecil/soldering). The pinecil-dev channel is a more limited chat for developers working on software/firmware such as IronOS or the new BLE bluetooth apps.
Firmware & Updates
See the Pinecil Firmware article for instructions on how to update Pinecil, this includes:
- Overview
- Flash Mode
- Update V2: Windows
- Update V2: Linux and Mac
- Troubleshoot V2 Flashing
- Build the Blisp Flasher from Code
- Update V1
- General Firmware Details
- Problems with IronOS firmware? Read documents here. If the answer is not found, open a ticket here or join the live pinecil community chat.
Development Projects
| Author | Project Homepage | Description | Supported |
|---|---|---|---|
| Ben Brown (ralimtek) | Ralim's IronOS | Official Pinecil firmware | BL706, GD32VF103TB, Stm32f103 |
| Marek Kraus (gamiee) | Pinecil V2 Flasher | CLI Updater for Pinecil V2, BL70x MCU | Windows, Linux, Mac |
| Marek Kraus (gamiee) | Pinecil V1 Flasher | Pinecil V1 GUI Updater | Windows, Mac |
| Arkaitz Goni Hedger (spagett) | PineFlash V1 Flasher | Pinecil V1 GUI Updater | Linux, Mac |
| Joric (iamjoric) | BLE API for V2 | Github dev page | Windows, Linux, Android |
| Robert (builder555) | PineSAM | BLE script for Pinecil V2 settings | Windows, Linux, Mac |
| Bouffalo Lab | B-Lab Dev Cube | MCU vendor GUI for Dev/flashing | BL70x, BL60x, others |
| Alvin Wong | gd32vf103-pinecil-demo-rs | Rust code demos for Pinecil | GD32VF103TB |
Checklist
Prep tasks:
- Clean new tips with isopropyl alcohol to remove factory residue before installing (avoid strange behavior from poor contact). If you have none, try to wipe it down with dry clean towel especially the 2 contacts at the back (do not use water, it could get into the small white seam line).
- Do not bend the two tiny internal contacts, they are thin spring metal and may break.
- Only use one port, USB-C or the DC barrel, but Never both at the same time. Damage will occur to PC/ Laptop/ Pinecil!
- If using a DC barrel brick for power, do not use more than 24V for Pinecil V2 and not more than 21V for Pinecil V1 (a special end-user modification is possible for V1 which allows it to use up to 24V safely.
Upon receipt, or buying a used Pinecil, one may want to check the following:
- The display turns on when 5-21V is supplied (V2 models can do 24V).
- Use a USB type C cable or a DC 5525 center positive barrel (how to check polarity)
- Use the video linked to make sure the DC barrel charger is Center Positive before plugging it into Pinecil. Several users have accidentally plugged incorrect center-negative chargers into Pinecil which immediately breaks it because it is the wrong type of charger (this is sometimes repairable, see live community chat).
- Caution: do not plug in both USB-C and DC5525 at the same time. This will destroy devices, posibly your laptop/pc and pinecil.
- The two ports are are used independently and not at the same time.
- Note that 5v shows DC low and is not high enough to run Pinecil. 5V is only enough for firmware update and to see the menu.
- It gets full power.
- 20V from a 20V capable USB-C PD charger or power from DC barrel charger that is the appropriate specifications. The screen displays the voltage from the charger.
- Check both orientations of the usb-C cable (try to flip it if one way doesn't work).
- Check for new firmware updates, see the Firmware section.
- Note: do not connect the DC barrel at the same time as a USB-C cable. Pinecil was designed to only have one cable plugged in at a time. You could damage the PC or Pinecil doing this.
- V1 and V2 used different Flasher apps to load firmware onto the pinecil, see the Firmware section.
- Updating firmware requires a data capable USB cable connected to a PC/laptop.
- Check that both buttons work
[-]to enter menu or decrease temperature, long press[-]to get the software version info or to turn off heating[+]to turn on heating or select a menu item
- The displayed text rotates according to gravity when orientation is set to Automatic
- User interface -> Display orientation -> Automatic
- More menu options listed on IronOS documents
- Check that all 3 external screws are present
- One near the back of the screen (ground screw for optional ground wire)
- One at the front on top (to hold the tip in)
- One at the front on the bottom (to hold the case together, does not touch the tip)
- Check that the tip is clean & wipe it down with a dry towel or IPA (uniformly silver at the front, with no pitting or texture).
- Some tips come pre-dipped in solder for protection and may look odd. Heat them up, then wipe clean on a soldering sponge or brass wool and inspect.
- See Pinecil Tips and Guildes to Soldering & Maintenance for soldering advice.
- Re-tin the tip before storing is advised to prevent oxidation.
- Check that it heats up with an installed tip, and stops increasing when it reaches the set point.
- This may draw up to ~3A, make sure the power supply can provide a minimum of 3amps or more.
- Minor overshoot may occur, but, disconnect power if the temperature keeps going up higher without user input and check with the live volunteer pinecil channel.
- Do a simple test is to see if the iron will melt solder at approximately the expected temperature for the alloy of solder being tested.
- If no direct measurement is possible, set it to ~230°C and see if it just about melts SAC (lead-free) solder (~190°C for leaded). This may be more if the room is cold.
- If there are multiple tips, wipe all of them with Isopropyl Alcohol (IPA) or a dry clean towel and check that they all heat up.
- If the tip moves a little while using it, try to hold Pinecil with the screen facing the side or screen downwards. Members found that if the screen is up and the screw loosens during use, then the tip wobbles a little. Changing holding angles helps the tip press against the solid barrel instead of wobbling on the stub of the small screw.
Power Supplies and Watts
Generally, higher watts is better, up to how much you can afford.
Power Chart
| Type | Volts | / | Tip Ω | = | Amps | * | Volts | = | Watts |
|---|---|---|---|---|---|---|---|---|---|
| USB-C PD3.0 | 20V | / | 8.0 Ω | = | 2.5A | * | 20V | = | 50W |
| USB-C PD3.0 | 20V | / | 6.2 Ω | = | 3.2A | * | 20V | = | 64W |
| DC Barrel | 24V | / | 8.0 Ω | = | 3.0A | * | 24V | = | 72W |
| DC Barrel | 24V | / | 6.2 Ω | = | 3.8A | * | 24V | = | 92W |
| *EPR PD3.1 | 28V | / | 8.0 Ω | = | 3.5A | * | 28V | = | 98W |
| *EPR PD3.1 | 28V | / | 6.2 Ω | = | 4.5A | * | 28V | = | 126W |
Power Notes
* PINE64 officially states the Pinecil V2 will support up to 24V-88W. Tentatively, the V2 also unofficially supports 28V-140W EPR/PD3.1 chargers with certified EPR 240W USB-C cables.
- Ralim's IronOS firmware works with the PD3.1 protocol (EPR 28V-140W chargers) on Pinecil V2.
- EPR USB-C is new to the market in 2022. The chargers are more expensive and require EPR PD 3.1, 240W cables to maximize the power to V2.
- EPR is backwards compatible for all USB-C devices. EPR chargers/cables can be used for everything else USB-C as well.
- Pinecil is not a USB-C tester: when the detailed screen is enabled on Pinecil, note that these are estimates and are at best +-10%. The watts shown on detailed mode is a big picture number for convenience and debugging various chargers used. It is not going to be as accurate as an external tester. Use external metering for comparisons or testing (external also testers cause a small reduction in Watts).
QC Chargers
Many Quick Charge or QC3 phone chargers are not recommended as Pinecil V2 requires a minimum of 3 Amps or more to work properly (see Pine Store Official rating on power ports). Most QC 12V phone chargers are only 1.5 Amps, this will lead to Thermal Runaway or Undervoltage messages because of weak power (older QC2 type is not supported in the IronOS firmware at all).
Compatible Power Supplies
Go to the Pinecil Power Supplies article for instructions on how to set up a variety of power choices and a list of compatible power supplies and cables.
Specifications
Pinecil V2
- Package: 15cm x 9cm x 2.2cm, white box (released Aug 2, 2022)
- Dimensions: 155mm with solder tip or 103mm without solder tip x 12.8mm x 16.2mm
- Weight: 28g with solder tip, 18g without solder tip
- Soldering Tip: includes type ST-B2 (short tip), Length 86mm, weight 8.2g
- Platform: Ralim's IronOS build
- Display: OLED White Color Monochrome Display 0.69" 96x16 pixels
- Chipset: Bouffalo BL-706
- CPU: 32-bit RV32IMAFC RISC-V “SiFive E24 Core” @ 144 MHz
- Memory:
- 192KB Internal Flash
- 132KB SRAM System
- Power Ports (12V-24V, 88 Watts):
- Only use one power port at a time (usb or DC barrel)
- USB type C: PD 12V-20V 3A and QC 3.0 12V-20V 3A (magnetic tip USB-C cables are not recommended, and not USB compliant)
- Barrel Jack: DC5525, 12V-24V, minimum 3amps.
- Trying to use an incorrect barrel jack, i.e., DC5521 will BREAK the connector (if it doesn't go in easy, it doesn't fit).
- Recommend operating voltage 12-24V, but a 12V USB-C charger will not perform as well or heat as fast as a USB-C PD65W/20V/3amp charger.
- Tentative support: EPR 140W/28V PD3.1 chargers + EPR cables are theoretically supported in hardware and IronOS firmware.
- EPR is new technology in 2022. Theoretically Pinecil could get a max of 28V and 126W using EPR chargers & EPR cables (natural loss of 140W to 126W due to Tip ohms).
- Bleeding edge users are using/testing this.
- EPR is potentially the fastest/highest performance possible for V2; officially Pine Store states 12V-24V, 88W.
Pinecil V1
- Package: 16.8cm x 11.8cm x 2.3cm, black box with clear plastic front (sold before Aug 2, 2022)
- Dimensions: 170mm with solder tip or 98mm without solder tip x 12.8mm x 16.2mm
- Weight: 30g with solder tip, 20g without solder tip
- Display: 0.67" QUG 9616TSWCG02 96x16 Monochrome Matrix display
- CPU: GD32VF103TB 32-bit RV32IMAC RISC-V “Bumblebee Core” @ 108 MHz
- Memory:
- 128KB Flash
- 32KB SRAM
- Power supply (12V -21V, 65W):
- Only use one power port at a time (usb or DC barrel)
- DC 12V-21V 5525 Barrel Jack. Do not try to use a larger 5521 (which requires excessive force). It will BREAK the connector.
- USB-C 12-20V PD or QC3.0 (magnetic tip USB-C cables are not recommended, and not USB compliant)
- Recommend operating voltage 12-21V, some components can tolerate higher voltages at "absolute maximum" but it's very ill-advised
Fasteners/Screws
- Originals screws are Phillips (source): two M2x3mm at the front, and one M2x4mm is the ground screw near the
[-]minus button. - The bottom-front screw only holds the handle together and does not touch the tip, hence is a shorter m2x 3mm.

- Thumb screws are popular upgrades: an M2 x 4mm thumb screw could replace both, the screen-side Tip holder screw, and the rear end ground screw.
- It was found that an M2x3mm thumb screw for the tip is a hair too short, and just grazes the Tip and the longer m2 x 4mm is better on top.
- Stainless Steel, smaller thumb screw, get M2x4mm
- Black, smaller thumb screw get M2x4mm
- Wider head (1) Thumb screw, (2) Thumb screw (3) Thumb screw
- Bling! Gold hex screws
- Many Assorted M2x4mm screw Options
- If you just want to swap out the stock Phillips screws for Hex key/Allen screws get two - m2x4mm & one- m2x3mm: (1) Hex socket screw, (2) Hex socket screw and (3) Hex cap screw
Manuals
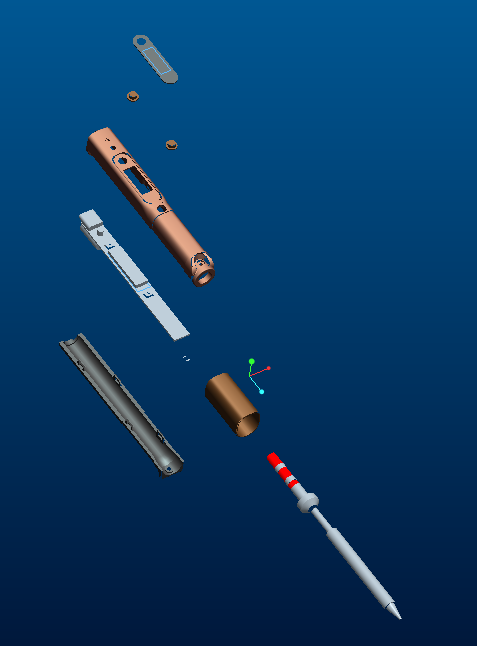
Pictures
Pre-release:
Pinecil renders
Pinecil prototype


Production:
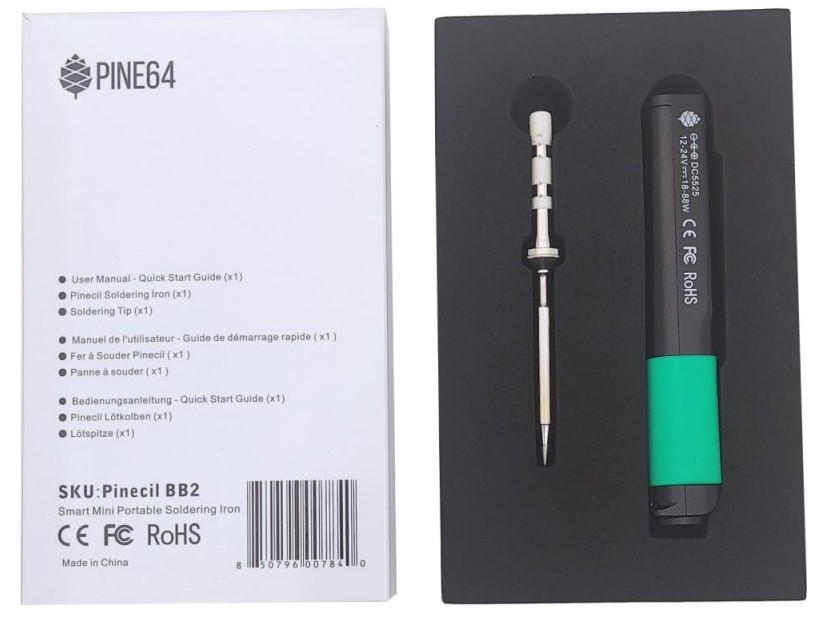
Pinecil V2 and ST-B2 short tip retail package, sold after Aug. 2, 2022
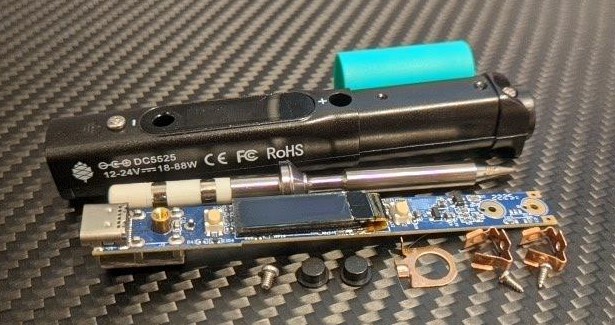
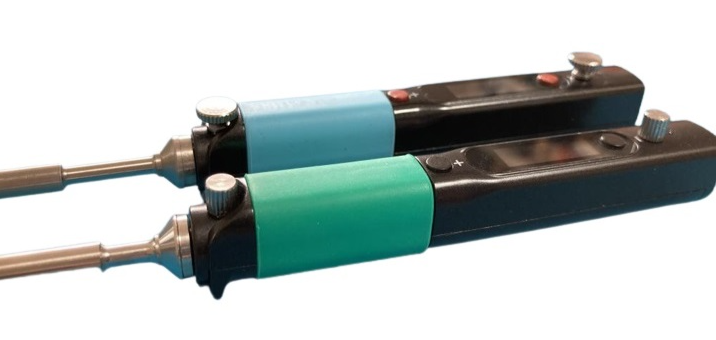
Pinecil V2 disassembled with new teal silicone grip, newly designed shorter 6.2 ohm tip

Clear handle with transparent rubber finger grip
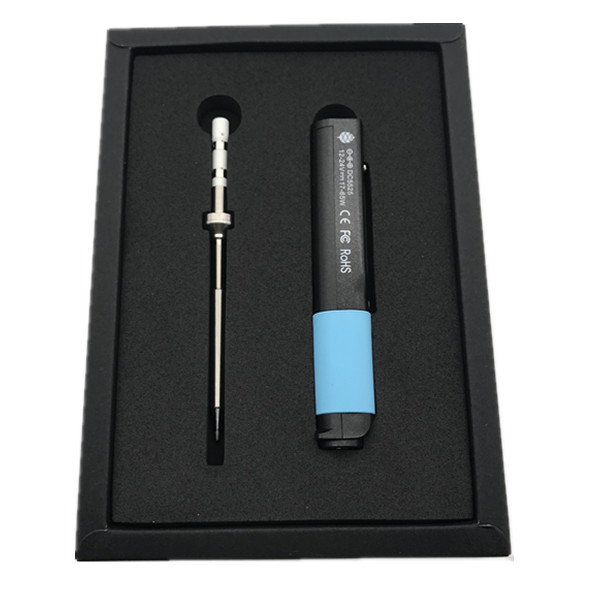
Original Pinecil V1 and TS-B2 retail package, discontinued July 2022


Tips:


PCB:
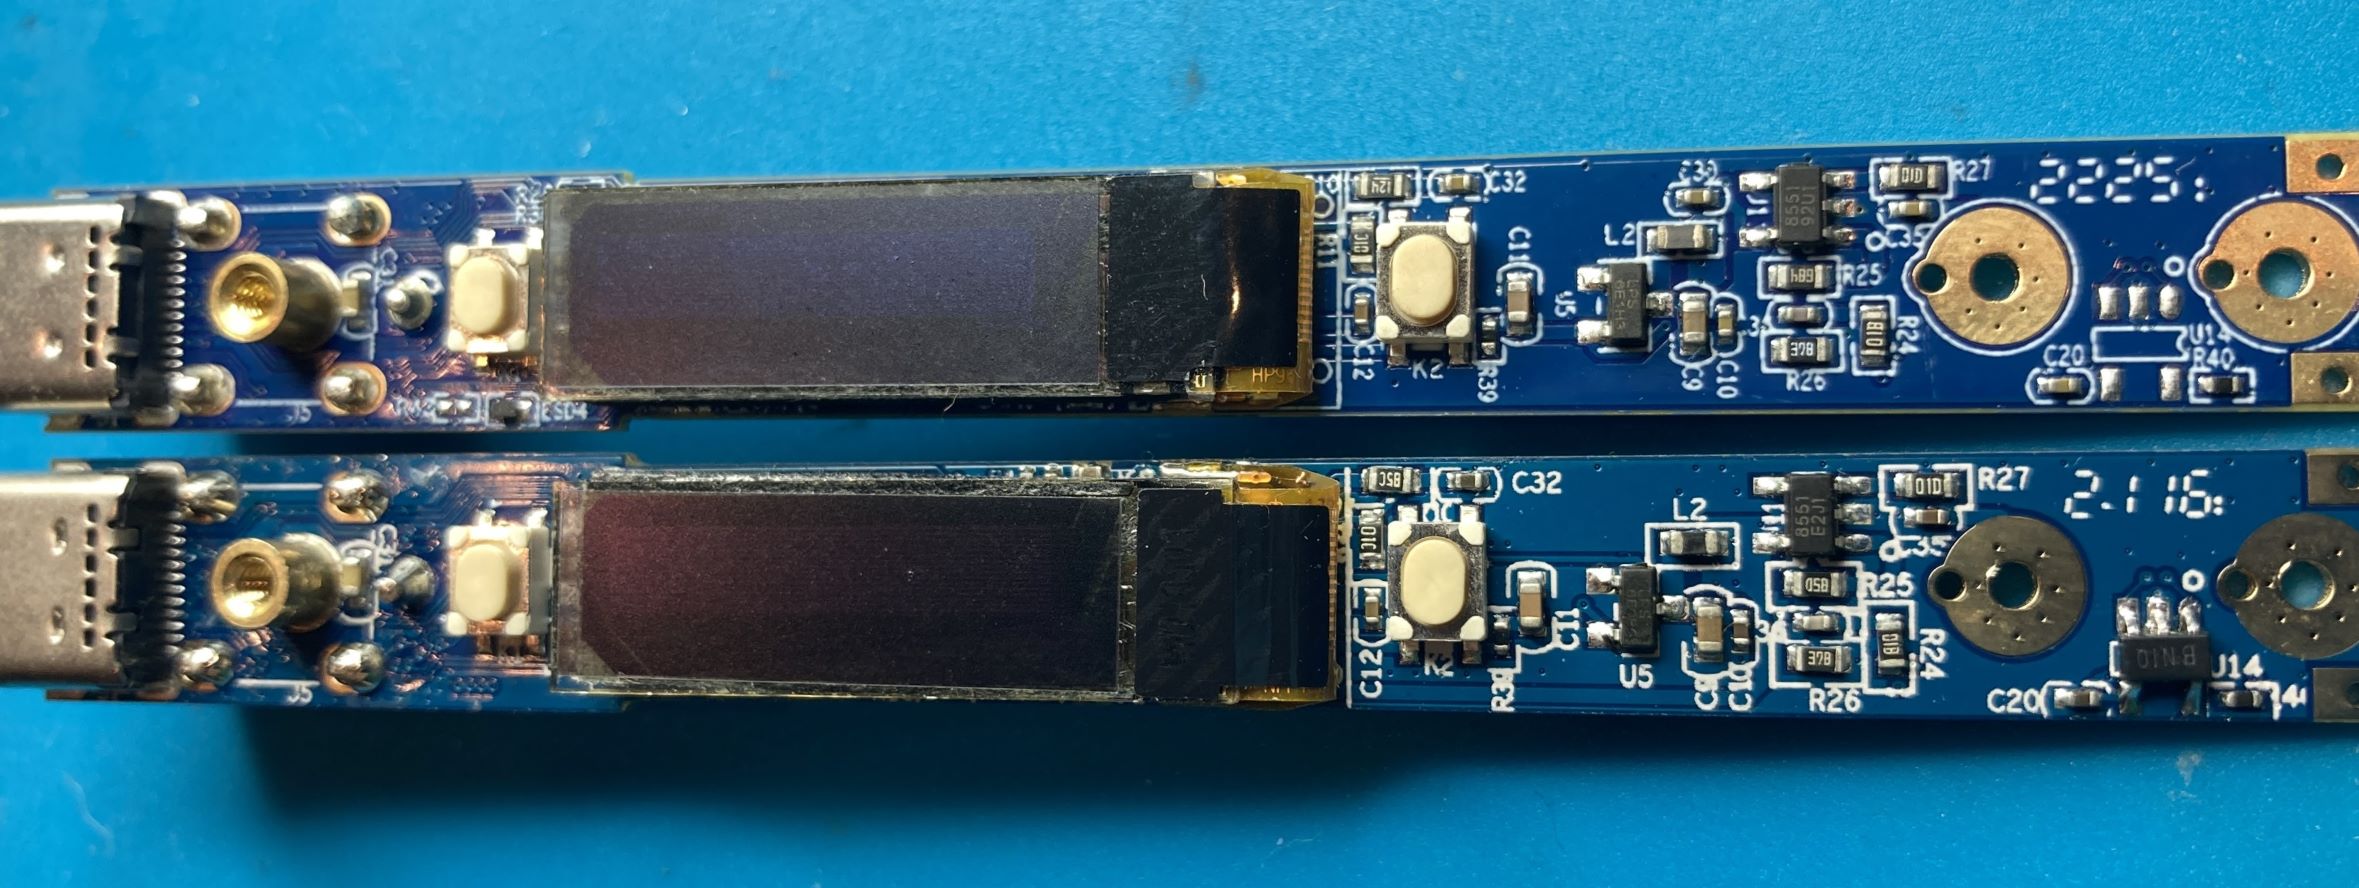
Pinecil PCB screen side, V2 on top, V1 on bottom
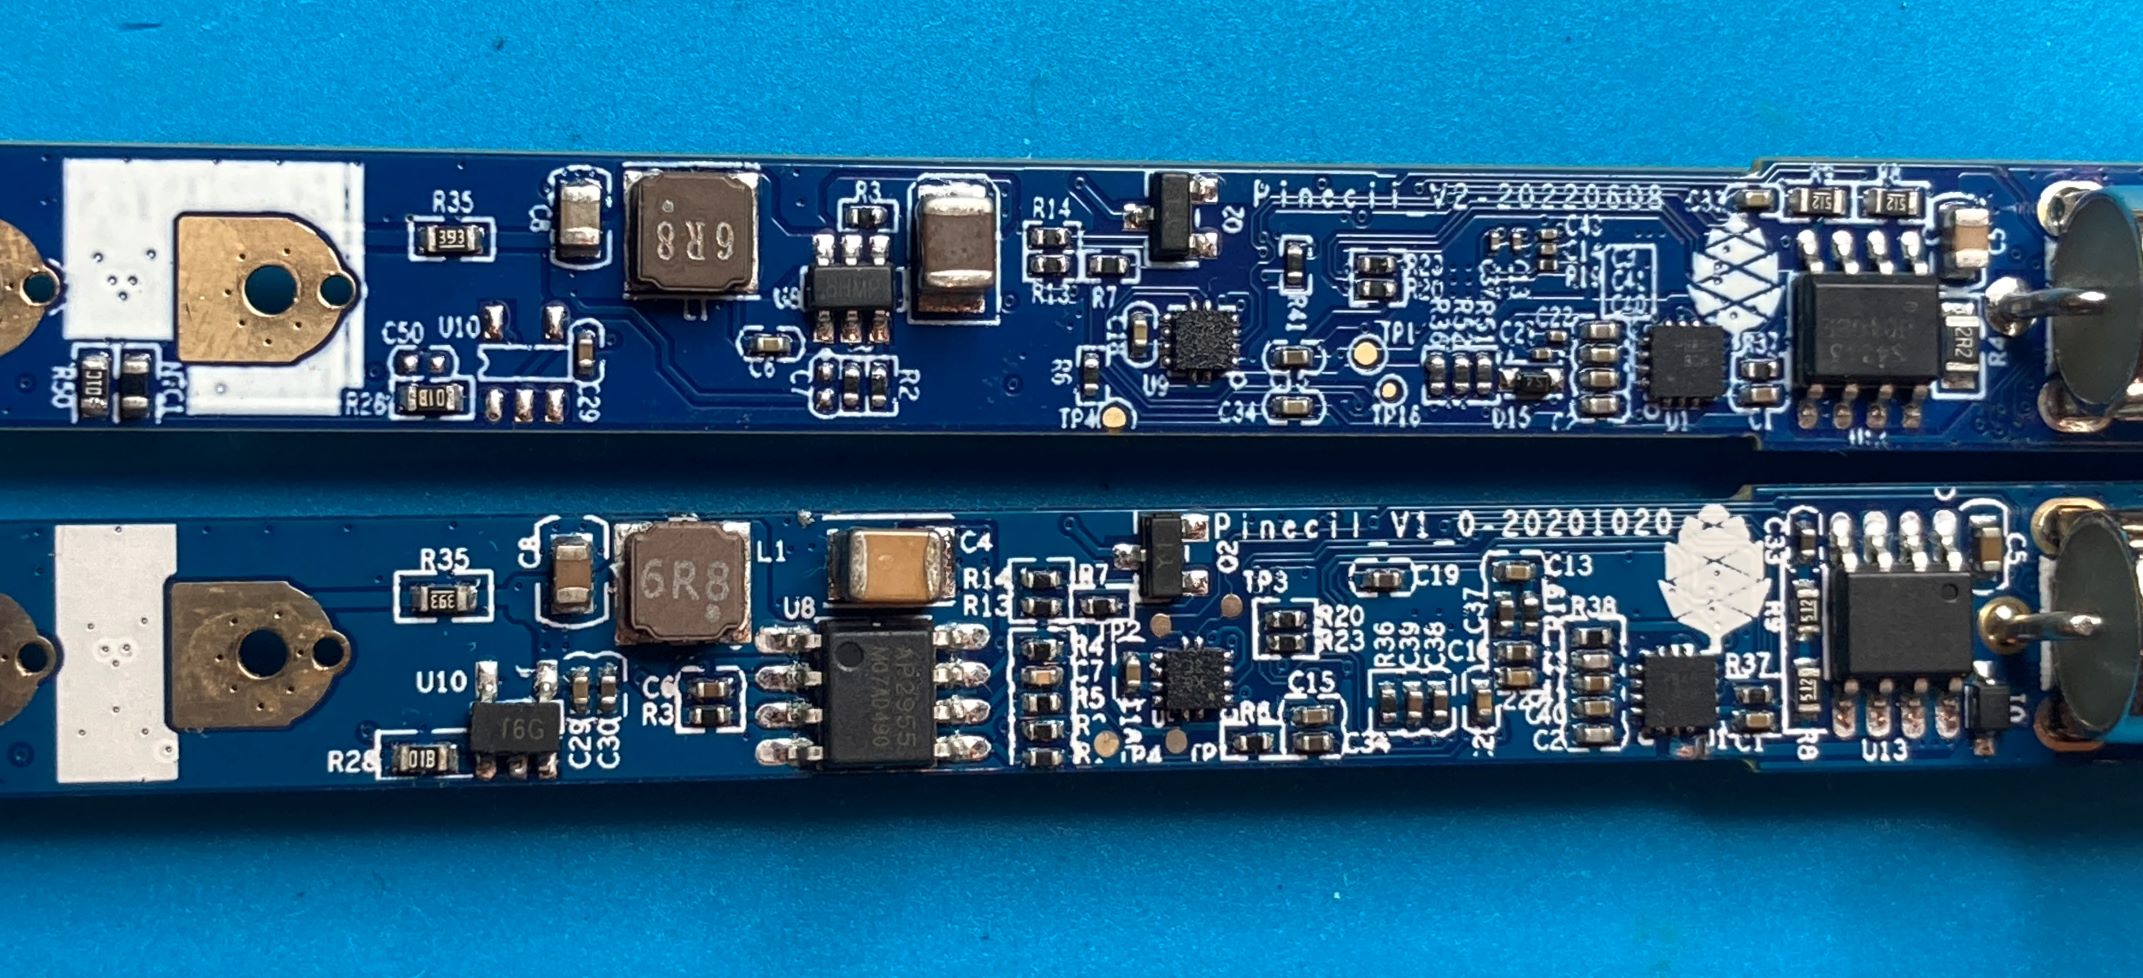
Pinecil PCB bottom side, V2 on top, V1 on bottom

Accessories:
Thumb screws on V1 & V2

Pinecil Tips
Details on the Pinecil Tips can be found in the Pinecil Tips article.
- What kind of tips work?
- How to increase tip life?
- How does the tip work?
- Pine64 Short tips
- Pine64 Normal tips
Note: Pay attention to the length! Pine Store sells two different lengths.
Guides to Soldering & Maintenance
The guides regarding soldering and maintenance can be found in the Pinecil Guides to Soldering article. The article includes the following topics:
- General soldering guides
- Does solder type and flux matter?
- How to keep the tip clean?
- What temperature should I use?
Cases, Stands, 3D models, Supplies
The main article about cases, stands, 3D-models and supplies can be found under Pinecil Cases, Stands, Supplies.
Batch changes
V2
- On Aug. 2, 2022, Pinecil V2 was released with improved hardware & accessories. It retains the same ergonomics and design as the original Pinecil, and will work with any accessories you already have including existing cases and tips. It comes with a green color silicone grip versus the light blue finger grip from Pinecil V1. It also includes one of Pine64's newly designed shorter 6.2 ohm tips. By reducing the tip resistance from 8 to 6.2 ohms, it allows greater performance and and faster heating (64W @ 20V compared to 8ohm tips which allowed a max of 50W to Pinecil). Pinecil V2 is rated for 12V-24V.
- Key changes in V2: new processor (BL706), higher maximum input voltage (24V), tentative support for USB-PD3.1 EPR (28V), support for measuring tip resistance, allows automatic detection of 6.2 vs 8 ohm tips. A notable improvement is the new BL706 RISC-V processor from Bouffalo. It is similar to the BL602 in the Pinenut. The BL706 features Bluetooth Low Energy (BLE / Zigbee); future IronOS firmware releases will work to expose features over BLE. This is not trivial work, but as people contribute to the opensource code of Github/IronOS, the BLE will be expanded.
- Things staying the same in V2: V2 still uses a RISC-V processor, but adds noticeable upgrades to the hardware. GPIO is broken out on USB-C for creating your own projects, same pinout as Pinecil V1, same great feel, including the rubber grip, works with all existing tips, same DC input + USB-C input connections, same case as V1 and compatibility with the clear or black handles.
- In V2 labeling, the 88W figure comes from a 6.5ohm tip calculation. The reason for using 6.5 instead of 6.2 for the new short tips calculation is due to tolerance during manufacturing, and leaving a conservative margin of error (actual tips appear to be 6.2 ohms). V2 set max voltage is listed as 24V because this was the value used during design and component selection.
V1
- For the first manufacture batch (October 2020, order number 158xxx) of the Pinecil, the copper ring connecting the earth screw to the tip was omitted as the engineering team found the TS100 design lacking. For the second round onward, an improved design copper ring has been included as standard, and is also included with the replacement clear and black handles. For normal operation of the iron, omission of the ring does not impact it's operation. If you are working with ESD components, you will need it in order to ground the iron tip via the earth screw at the back of the iron.
- Programmable with tools from Gigadevice
- The first batch of Pinecils were rated 12-24v @ 65W. After some heated discussion on the discussion group, it was decided that it would be downgraded to 12-21V @ 60W, due to concern over the connection of the DC jack to the USB-PD chip, which has a recommended maximum of 21v, and absolute maximum of 28v.
Schematics, Board Data, Certifications
Pinecil V2 mainboard schematic
- Pinecil mainboard schematic ver 2.0 20220608, this is production version schematic
- Pinecil mainboard ver 2.0 PCB Component Placement PDF file
Pinecil V2 Certifications:
Pinecil V1 mainboard schematic
V1 was only sold until July 2022, and then discontinued for newer V2 model.
- Pinecil mainboard schematic ver 1.0 20201120, this is production version schematic
- Pinecil mainboard ver 1.0 PCB Component Placement Top PDF file
- Pinecil mainboard ver 1.0 PCB Component Placement Bottom PDF file
- Pinecil mainboard ver 1.0 PCB Component Placement Top Drawing file
- Pinecil mainboard ver 1.0 PCB Component Placement Bottom Drawing file
Pinecil V1 Certifications:
Pinecil Breakout board
Get the Breakout Board here
Photos:

Store photo
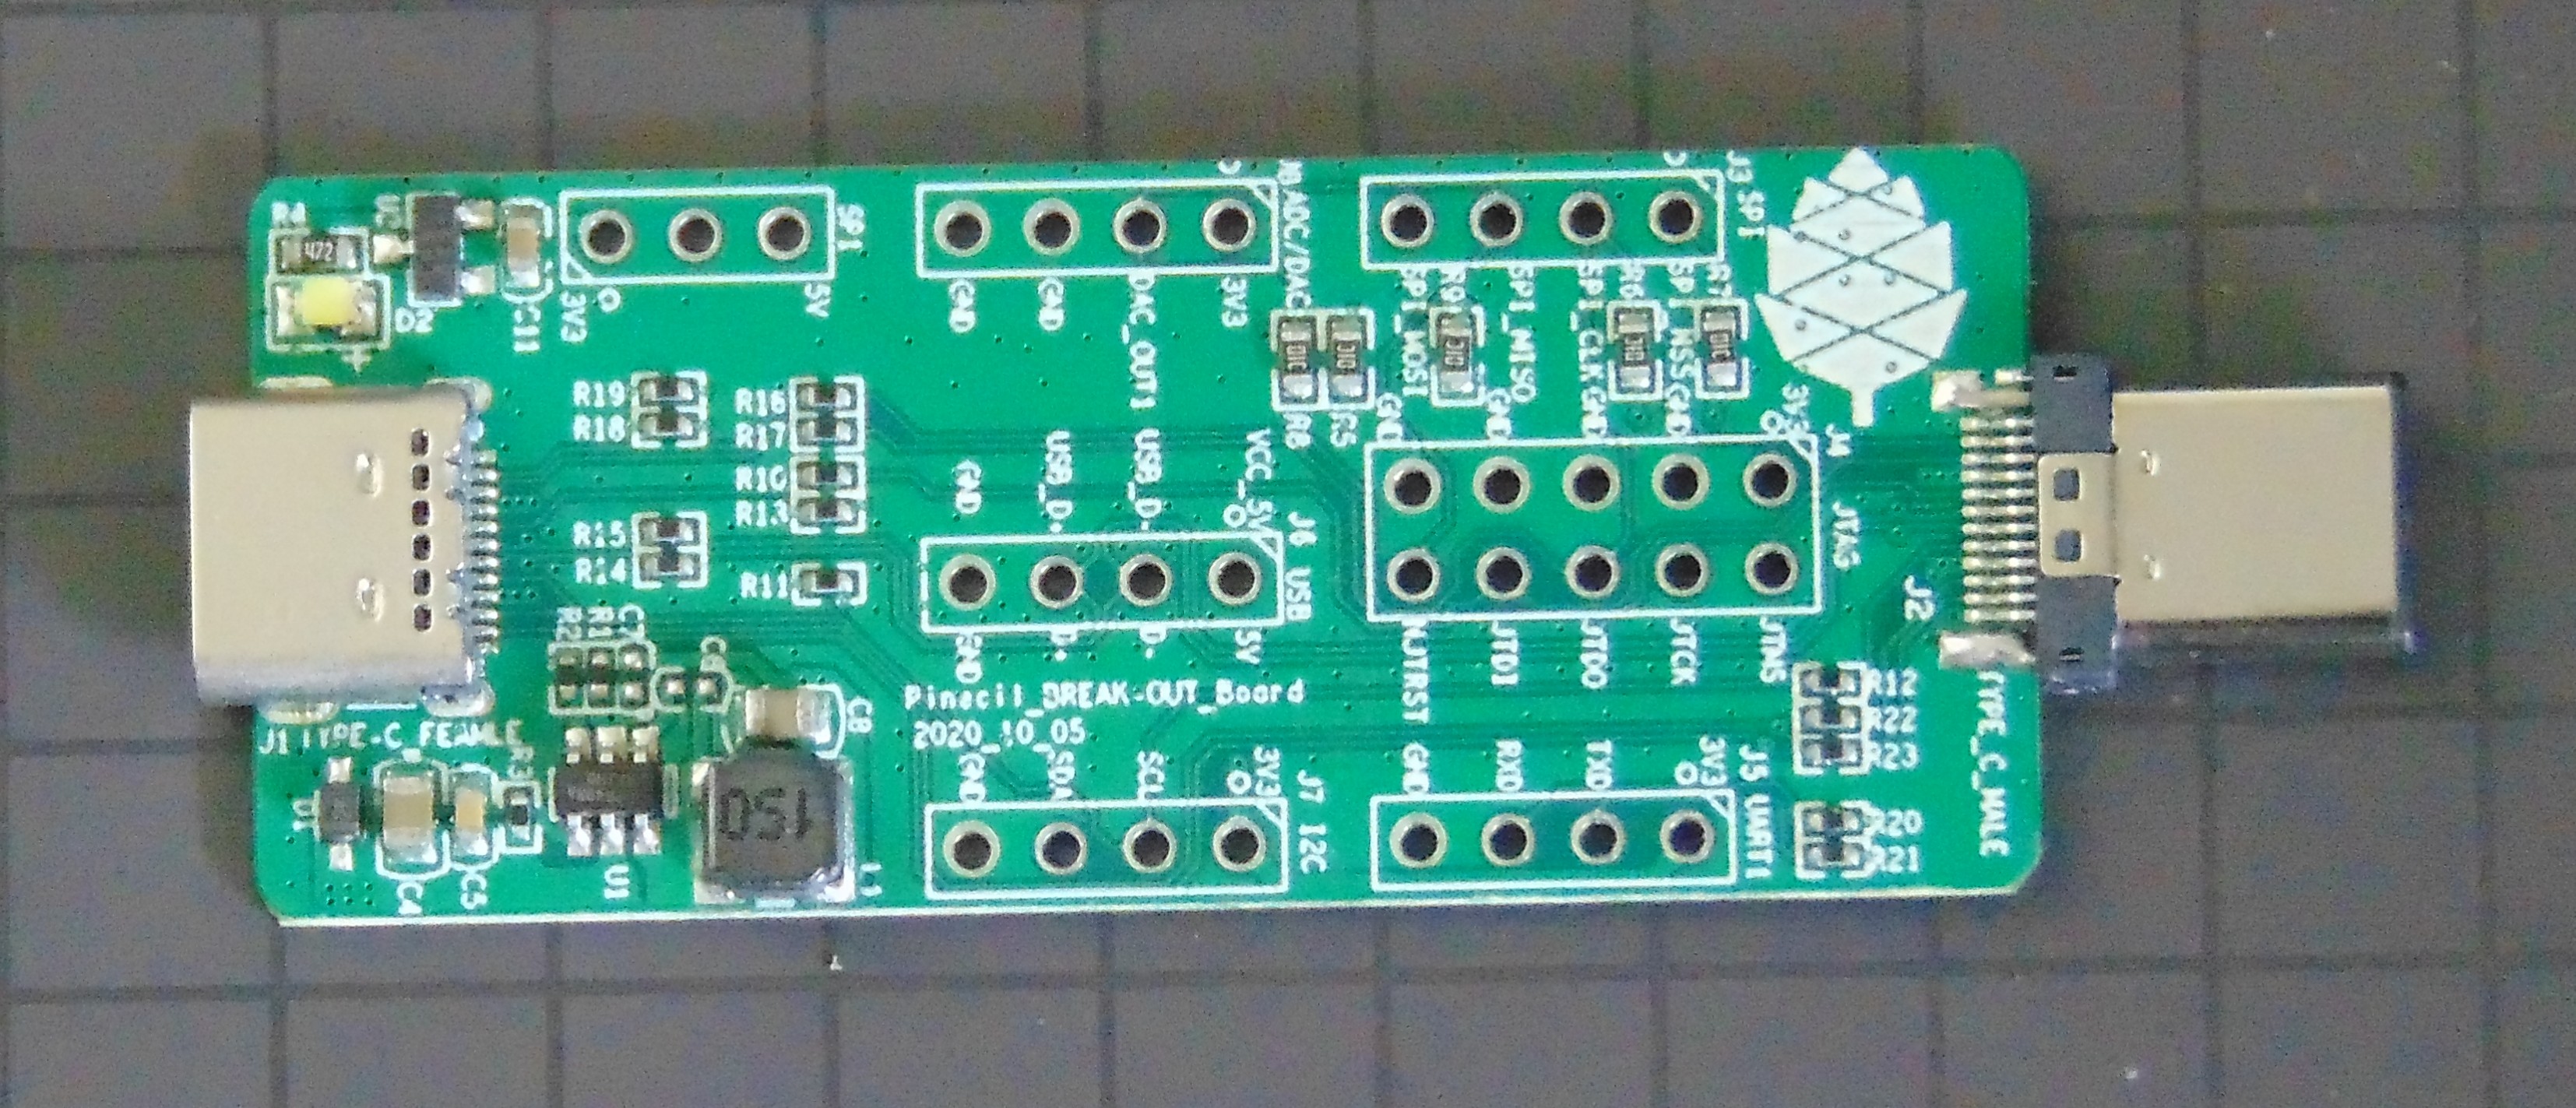
Top view
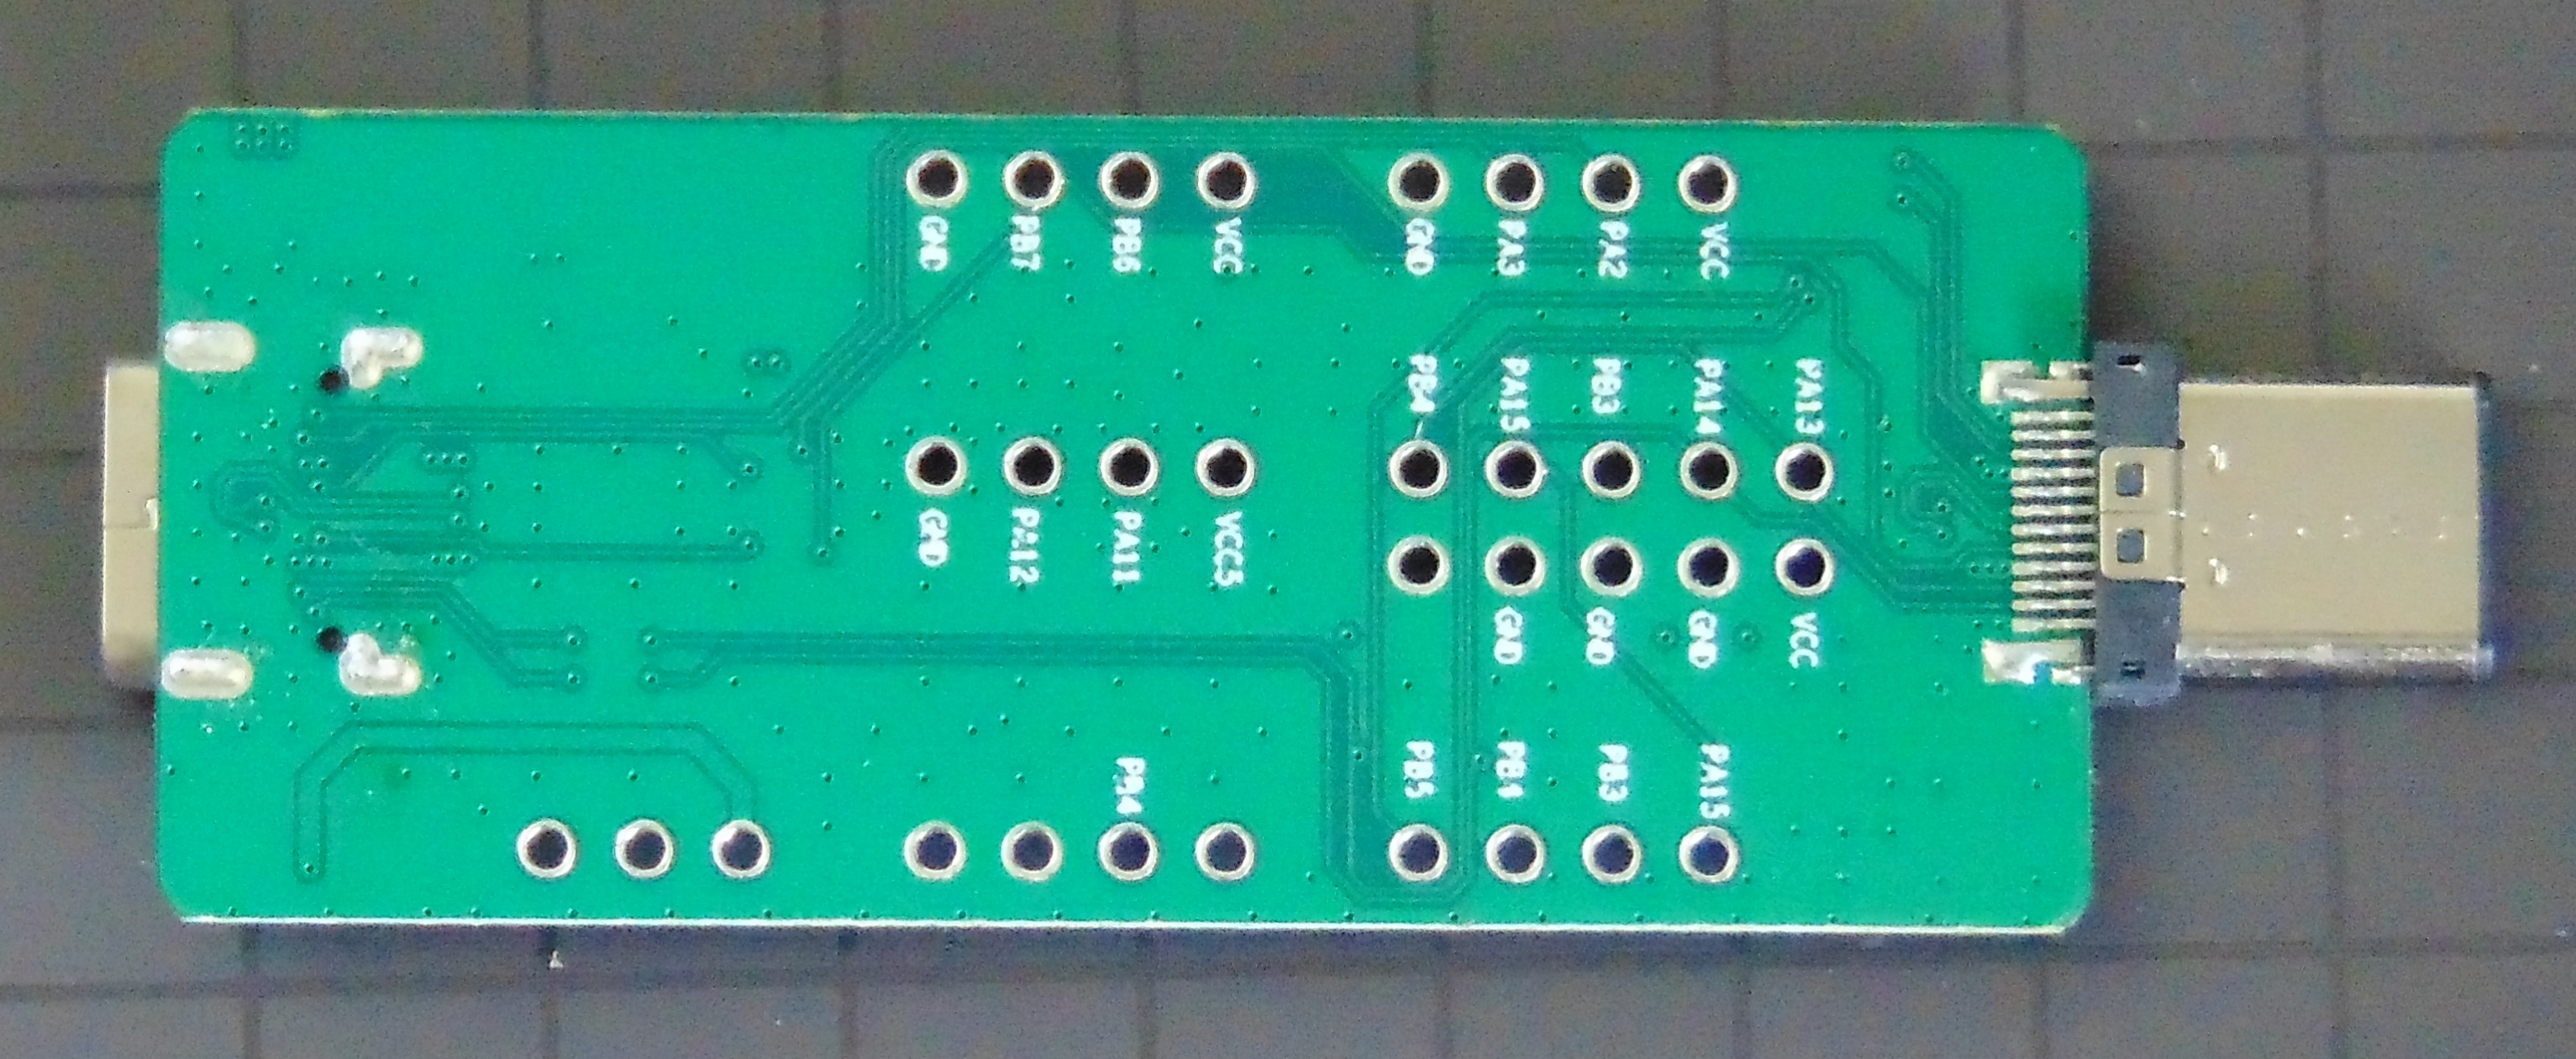
Bottom view


Datasheets for Components
Pinecil V2
USB-C PD Controller data:
- FUSB302MPX, location U1
- (Replacement FUSB302MPX)
Power Regulators:
- LP 3986-33, Ultra-low noise LDO Regulator, location U5
- (Replacement LP 3986-33)
- TP6841S6 40V Step-Down Buck Converter, location U8
- (Replacement TP6841S6-A)
Sensor data:
- SC7A20, Acceleration/Gyroscope sensor, Silan, location U9
- NTC Temperature Sensor, location NTC1 (U10 will be empty if NTC is used)
- (Replacement NTCG163JF103FTDS)
- Optional Hall Effect Sensor Si7210-B-00-IV(R), by Silicon Labs, this is a user add-on, location U14
- (How magnets work near Hall Sensor Si7210)
- (One place to buy it. Also sold on Digikey and Mouser.)
Power MOSFET Switch:
Operational Amplifier:
Display Screen OLED:
MCU: Bouffalo Labs, BL-706_QFN48, RISC-V + 2.4 GHz RF SoC Information:
- BL706 Analysis by Lupyuen, includes datasheet, location U15
- BL706 datasheet
- BL706 Reference Manual
- SDK and Bouffalo documents
- SMD Resonator 32MHZ/12PF-10PPM, SMD2016-4P, location UX1
- Replacement SMD Resonator 32MHz/12PF-10PPM
USB-C port:
- possible part, has not been verified: Replacement
Pinecil V1
GigaDevice RISC-V SoC data:
Sensor data:
- Bosch BMA223 Acceleration Sensor Datasheet
- Analog Device TMP36 Temparature Sensor Datasheet (U10)
- Hall Effect Sensor (Si7210-B-00-IV by Silicon Labs), Optional add-on at U14 location
Display Module data:
USB Type-C PD Controller data:
Power Regulator data:
- Ricktek RT7272B 3A Switching Power Regulator Datasheet (U8)
- LP 3986-33, Ultra-low noise LDO Regulator (U5)
- (Replacement LP 3986-33)
Power MOSFET Switch data:
OP Amp information:
Capacitors:
LowPowerSemi LP6498B6F 1.2A Switching Power Regulator Datasheet - on breakout board
USB-C port:
- possible part, has not been verified: Replacement
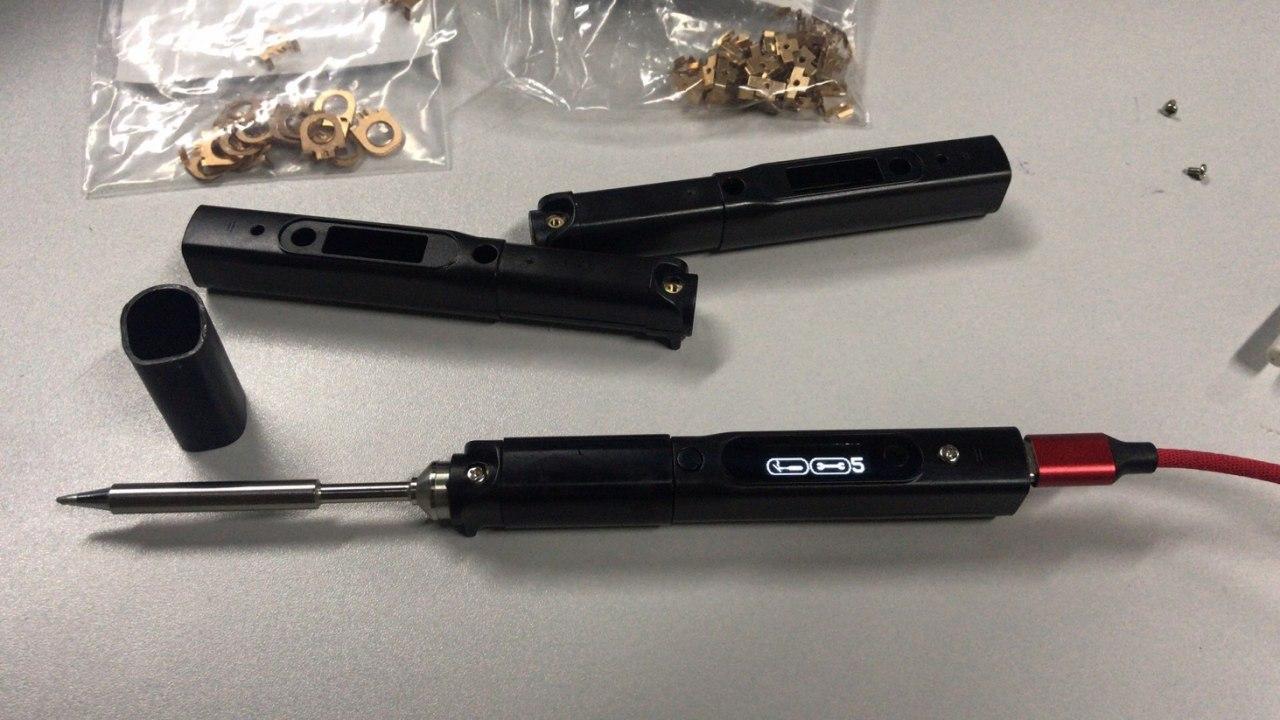
How to Test & Repair
Have a dead Pine64 Pinecil or a malfuctioning one?
Black screen of death?
See this article Pinecil: How to Repair which includes:
- Disassembly steps
- Easy trick to open the Pinecil, see Video here].
- Assembly steps
- Diagnosis & Testing
- Pinecil V1, 24V mod