Pinebook Pro SPI
The Pinebook Pro comes equipped with two non-volatile storage components, the eMMC and the SPI. The capacity of the SPI is 128Mbit (16MiB) and it may be used in the boot process.
Boot data can be written to the SPI via two methods: either from within PBP or from a second machine connected to the PBP by USB.
Writing to SPI from within PBP
The easiest way to start with SPI is to flash TowBoot using its dedicated installer SD image from https://github.com/Tow-Boot/Tow-Boot/releases . TowBoot is a much simplified U-Boot with a UI menu for selecting a boot device.
Forum user pcm720 provided an example of writing to the SPI from within Linux in their self-published version of U-Boot that offers boot functionality for NVMe drives. It involves use of flash_erase command (available in the mtd-utils package on Arch Linux and Manjaro) and the dd command.
However, flashcp command should be used instead of dd, to make sure all specifics of the underlying flash memory are covered.
Writing to SPI from a second machine
Writing to the SPI from a second machine is more complicated than the other method, but it is the only option when troubleshooting an SPI flash gone wrong. This method works by bringing the RK3399 SoC into maskrom mode and issuing commands on the second machine that download the flash image onto the Pinebook Pro.
Upon entering maskrom mode, the power LED on your Pinebook Pro won't light up and neither will the display. Instead, your second machine, the one connected to your Pinebook Pro via USB, will indicate maskrom mode by logging to journalctl.
There are two ways to reach maskrom mode, but the first tends to be less reliable.
Maskrom mode (unreliable method)
According to Rockchip documentation, these steps should work; unfortunately, many users have reported them to be unsuccessful. You may need to repeat these steps several times for them to work.
- Press and hold recovery button.
- Short press reset.
- Release recovery button after about three seconds.
In case this approach fails, please see the section below for a more reliable method.
Maskrom mode (reliable method)
- Build and install
rkdeveloptool(see project repository for instructions) - Verify successful installation. Running
rkdeveloptool --versionshould output:rkdeveloptool ver 1.3 - Run
journalctl -fand keep it running. Once the Pinebook Pro is connected and maskrom mode is reached it will produce additional output. - Power off the Pinebook Pro.
- Unscrew the bottom cover.
- Remove the metal RF shield surrounding the main CPU. The shield is held in place by small clamps on the board. The clamps can be released with a pry tool and some force. This forum post with photos shows how it can be done.
- Disconnect all boot devices, i.e. eMMC, microSD card and USB.
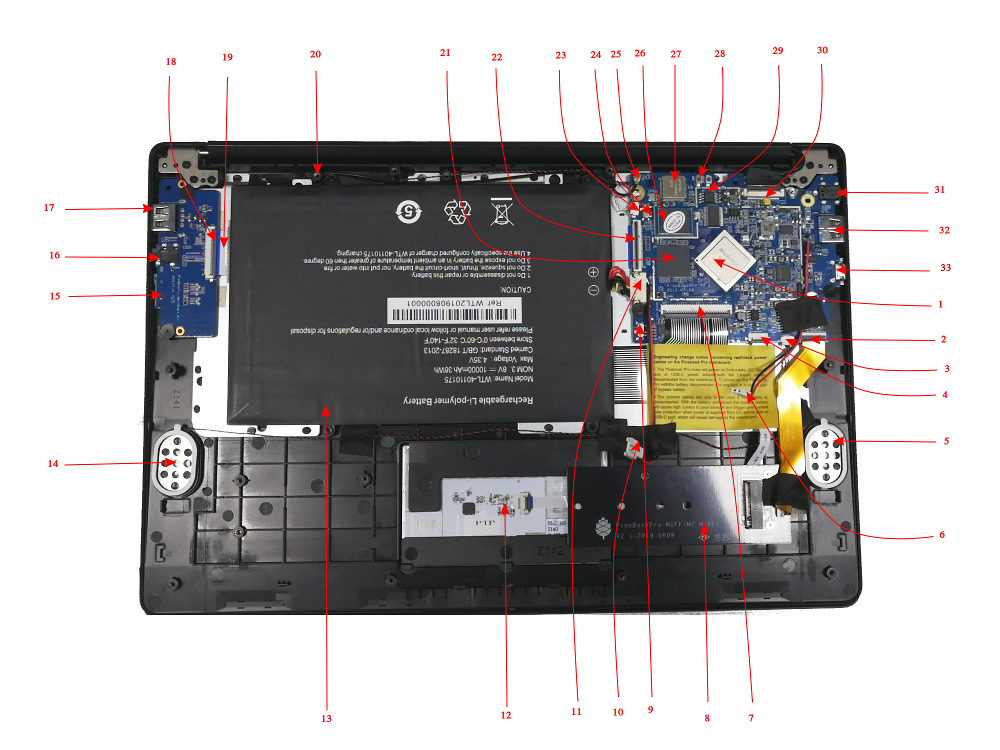
- Locate SPI flash (component number 29 on this photo of the Pinebook Pro internals).
- Connect your Pinebook Pro with USB-C to USB-A cable to second machine (Pinebook Pro on the USB-C side)
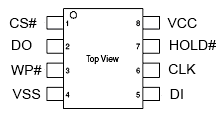
- Short pins CLK and VSS (see chip diagram to the right for the names of pins). This can be done with a pair of tweezers when short on tools.
- Power on the Pinebook Pro.
- Press the reset button (component number 28).
- Check is there new output from
journalctlprogram. - Check is the Pinebook Pro connected by running
rkdeveloptool ld. If successful, the output should be like:DevNo=1 Vid=0x2207,Pid=0x330c,LocationID=1401 Maskrom

After entering maskrom mode
Now that when the RK3399 SoC is in maskrom mode, you can use rkdeveloptool to write data to the SPI. To do so you'll need the binary file you'll be writing to SPI, which will be referred to as SPI_new.bin, and a helper file named rk3399_loader_spinor_v1.15.114.bin.
- Flash the flash helper db file:
rkdeveloptool db rk3399_loader_spinor_v1.15.114.bin. If successful, the output should readDownloading bootloader succeeded. - Flash the new SPI binary:
rkdeveloptool wl 0 SPI_new.bin. If successful, the output should read:Write LBA from file (100%). - Test the installation:
rkdeveloptool td. If successful, output should readReset Device OK. - Run
rkdeveloptool rdto reboot your Pinebook Pro.
Zeroing out the SPI
In case, you wrote something bad to your SPI, it's helpful to wipe away that data with zeros. To do that, you follow the same steps above to enter maskrom mode and then write a binary file that consists of all zeros.
- Create the binary file
dd if=/dev/zero of=zero.bin bs=1M count=16 - Flash the flash helper db file:
rkdeveloptool db rk3399_loader_spinor_v1.15.114.bin. If successful, the output should readDownloading bootloader succeeded. - Flash the new SPI binary:
rkdeveloptool wl 0 zero.bin. If successful, the output should read:Write LBA from file (100%). - Test the installation:
rkdeveloptool td. If successful, output should readReset Device OK. - Run
rkdeveloptool rdto reboot your Pinebook Pro.