Pinebook Pro SPI
Pinebook Pro SPI
Writing to the Pinebook Pro SPI
Necessary Items:
1. A screwdriver
2. USB Type-A to USB-C cable
3. Another Computer with a USB-A 3.0 port
- Not a requirement but if you want to boot from NVMe you need:
4. A bootable NVMe (i.e., with /boot/boot.txt having root=/dev/whatever_your_nvme_is plus some operating system.
Procedure:
1. Build and install rkdeveloptool on your other computer, find out all the info to do that on their Github.
2. Verify correct and successful installation:
rkdeveloptool --versionshould output:rkdeveloptool ver 1.3
3. On the same computer, make a directory to hold the necessary files.
mkdir ~/PBPBoot
- You will need to have two files in this directory:
- The db flash helper(rk3399_loader_spinor_v1.15.114.bin). This prepares the SPI for a binary.
- The U-Boot, or other bootloader binary.
Note: SPI binaries are built for SPI environment only. It will not work if you try putting it on your eMMC.
mv rk3399_loader_spinor_v1.15.114.bin ~/PBPBootmv dhiv_SPI_uboot.bin ~/PBPBootcd ~/PBPBoot
4. Put the Pinebook Pro into maskrom mode:
- Remove all bootable devices from your Pinebook Pro.
- Plug the Type-A end into your non-Pinebook Pro device.
- Plug the Type-C end into your Pinebook Pro.
5. Reboot the Pinebook Pro.
- To verify you are in maskrom mode, with your computers connected, run
rkdeveloptool ld - You should get an output like this: DevNo=1 Vid=0x2207,Pid=0x330c,LocationID=1401 Maskrom
6. Flash the flash helper db file.
rkdeveloptool db rk3399_loader_spinor_v1.15.114.bin- Upon success, the output should read Downloading bootloader succeeded.
7. Flash the new SPI binary.
rkdeveloptool wl 0 dhiv_SPI_uboot.bin- Successful output should read: Write LBA from file (100%).
8. Test the installation.
rkdeveloptool td- Successful output should read Reset Device OK.
9. Run rkdeveloptool rd to reboot your Pinebook Pro.
Recovering from broken SPI flashes/installs
If you accidentally soft brick your PBP there is special mode implemented called maskrom mode. In this mode the device is accessible as regular USB device and can be accessed using rkdeveloptools, especially to rewrite SPI flash or to erase it.
According to Rockchip documentation it should be accessible following below procedure:
1. Press and hold recovery button.
2. Short press reset.
3. Release recovery button after about 3 seconds.
You may need to repeat these steps several times to successfully get into maskrom mode. The nature of this problem is not clear. There are two suspicions:
- the button is not working correctly or is just prone to failures.
- the problem occurs only when the SPI was previously flashed.
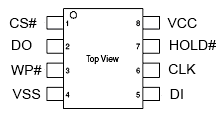
The button works by shorting two pins in an SPI device. But in some cases it just does nothing. So if you experience such problem there is a way to overcome it. You can short the two pins by yourself.
Procedure:
1. Compile rkdeveloptools --> https://github.com/rockchip-linux/rkdeveloptool.
2. Unscrew bottom cover.
3. Remove the metal shield surrounding main CPU - it is held in place by a tape and micro clamps on pcb.
4. Disconnect all (!!!) boot devices (emmc, sdcard, usb).
5. Locate SPI flash (number 29 on picture with Pinebook Pro internals).
6. Connect your PBP with USB-C - USB-A cable to another computer (PBP on USB-C side).
7. Turn on PBP, short pins CLK and VSS and press reset. It should get your PBP into maskrom mode. (see picture)
Zeroing out SPI Flash
On another computer:
1. Create a file filled with zeros
dd if=/dev/zero of=zerospi bs=1M count=16
2. Write the file to SPI.
rkdeveloptool db rk3399_loader_spinor_v1.15.114.bin
rkdeveloptool wl 0 zerospi
rkdeveloptool td
rkdeveloptool rd
