Difference between revisions of "User:RemDogKap/SandBox/First Setup"
m (changed example sections to be collapsible, fixed typos, changed to be filled in things from ${} to <>) |
(Replaced Linux unzip and flash instructions with a combined step. The manual anyhow assumes using a terminal so I assume it's not increasing needed user knowledge.) |
||
| Line 40: | Line 40: | ||
<div class="mw-collapsible mw-collapsed" id="mw-customcollapsible-if-dl-toggle"> | <div class="mw-collapsible mw-collapsed" id="mw-customcollapsible-if-dl-toggle"> | ||
$ wget <nowiki>https://pine64.my-ho.st:8443/star64-image-minimal-star64-1. | $ wget <nowiki>https://pine64.my-ho.st:8443/star64-image-minimal-star64-1.3.rootfs.wic.bz2</nowiki> | ||
</div> | </div> | ||
Next, | Next, flash the image to the SD card or eMMC module. | ||
$ bzip2 - | $ bzip2 -cd <Path to Image File> | sudo dd of=/dev/<Flash device> | ||
Where <code><Path to Image File></code> is the path to your image file. <span class="mw-customtoggle-if-unzip-toggle" style="text-decoration:underline;color:#0645ad">Example</span> | Where <code><Path to Image File></code> is the path to your image file and <code><Flash device></code> is the device name of your card or module. <span class="mw-customtoggle-if-unzip-toggle" style="text-decoration:underline;color:#0645ad">Example</span> | ||
<div class="mw-collapsible mw-collapsed" id="mw-customcollapsible-if-unzip-toggle"> | <div class="mw-collapsible mw-collapsed" id="mw-customcollapsible-if-unzip-toggle"> | ||
$ bzip2 - | $ bzip2 -cd star64-image-minimal-star64-1.3.rootfs.wic.bz2 | sudo dd of=/dev/sdb | ||
</div> | </div> | ||
====Windows==== | ====Windows==== | ||
Revision as of 21:42, 6 July 2023
Please help to review and edit this page or section. Information are subject to change.
The Star64 is a 64 bit, 4 core Single Board Computer.
Prerequisites
- Star64 SBC
- 12V 3A to 5A Power Supply (Any 12V 3A or 5A type M 5.5mm OD/2.1mm ID barrel type DC Jack Power Supply will work)
- One or more types of removeable flash memory
- SD card of at least ??GB, no greater than 256GB
- eMMC Module with USB adapter
- Ability to flash a storage device with a disk image. Balena Etcher is recommended, but advanced users can also use dd in a Unix-like OS
Choosing Your Distribution
There are currently two working distributions of Linux compatible with the Star64, pinix and Armbian. Both distributions use the same kernel[???].The pinix distribution is a custom distribution built by Fishwaldo using Yocto which is an open source project used to create Linux distributions for embedded devices. The pinix distribution is currently focusing on support for GPU and VGPU acceleration for desktop environments. Both distributions use the deb package manager. The Armbian distribution is based on Debian/Ubuntu with changes to make it lightweight and compatible with ARM/RISC-V development boards.
While there are other RISC-V compatible distributions, none of these have the required device tree entries for the Star64 meaning that none will work fully on the Star64. This includes images for the StarFive2, a sister board which uses the same processor, due to other hardware differences. It may be possible to get other distributions to run on the Star64 by cross compiling the working kernel into another distribution.
More information about support for features can be accessed here.
pinix
There are currently three prebuilt versions of pinix. one command line only and two desktop environments. Choose one to use for this setup.
- star64-image-minimal - A command line only image.
- star64-image-weston - A Weston/Wayland "Demo" image.
- star64-image-plasma- A Plasma Based Image.
Flashing the Image
Linux
First, if not already installed, install bzip2 and wget.
$ sudo apt update && sudo apt install bzip2 wget
Second, download a compressed disk image (.wic.bz2) of your chosen version (minimal, weston, or plasma) from here (source code available here) using wget.
$ wget https://pine64.my-ho.st:8443/<Name of Image File>
Where <Name of Image File> is the name of your chosen image file. Example
$ wget https://pine64.my-ho.st:8443/star64-image-minimal-star64-1.3.rootfs.wic.bz2
Next, flash the image to the SD card or eMMC module.
$ bzip2 -cd <Path to Image File> | sudo dd of=/dev/<Flash device>
Where <Path to Image File> is the path to your image file and <Flash device> is the device name of your card or module. Example
$ bzip2 -cd star64-image-minimal-star64-1.3.rootfs.wic.bz2 | sudo dd of=/dev/sdb
Windows
First, make sure that you have 7zip installed and if not, install it.
Second, download a compressed disk image (.wic.bz2) from here (source code available here) by clicking on the files.
Third, right click on the downloaded file and select 7-zip. Next click extract.
Finally, use Balena Etcher to write your disk image to the SD Card or eMMC module .
Booting the Image
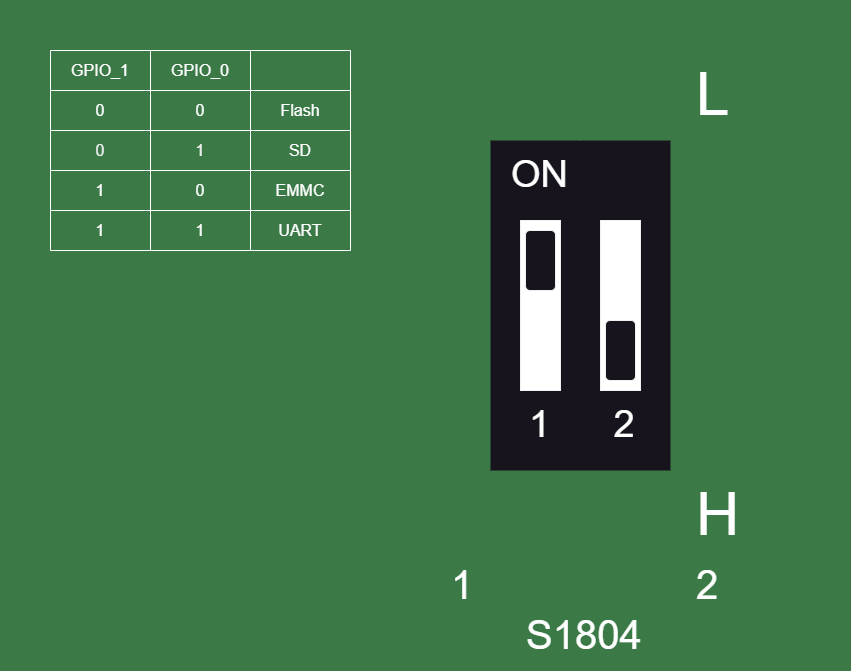
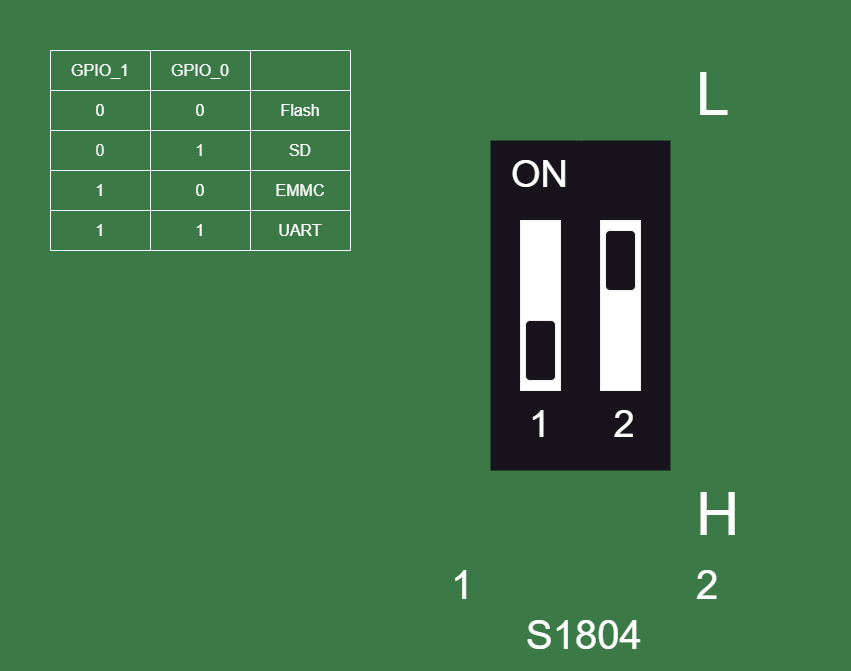
First, make sure that the Star64 is powered off, then set the boot dip switches to SD Card or eMMC, whichever applies to you.
After that, insert your flash media of choice and connect your peripherals. These can be a keyboard mouse and monitor or a TTL UART cable connected to the GPIO header. Finally, power on the system.
After boot, you should be met with a login screen. The default credentials here for a root user are root as a username and Star64 as a password. The default credentials for a regular user are Star64 as a username and Star64 as a password. If you do not see the troublshooting section below
Troubeshooting
If you get the following error in u-boot (or your 8Gb board is only detected as 4Gb) the possible problem is a empty, or corrupt eeprom:
Not a StarFive EEPROM data format - magic error
EEPROM dump: (0x100 bytes)
00: FF FF FF FF FF FF FF FF FF FF FF FF FF FF FF FF
10: FF FF FF FF FF FF FF FF FF FF FF FF FF FF FF FF
20: FF FF FF FF FF FF FF FF FF FF FF FF FF FF FF FF
30: FF FF FF FF FF FF FF FF FF FF FF FF FF FF FF FF
40: FF FF FF FF FF FF FF FF FF FF FF FF FF FF FF FF
50: FF FF FF FF FF FF FF FF FF FF FF FF FF FF FF FF
60: FF FF FF FF FF FF FF FF FF FF FF FF FF FF FF FF
70: FF FF FF FF FF FF FF FF FF FF FF FF FF FF FF FF
80: FF FF FF FF FF FF FF FF FF FF FF FF FF FF FF FF
90: FF FF FF FF FF FF FF FF FF FF FF FF FF FF FF FF
A0: FF FF FF FF FF FF FF FF FF FF FF FF FF FF FF FF
B0: FF FF FF FF FF FF FF FF FF FF FF FF FF FF FF FF
C0: FF FF FF FF FF FF FF FF FF FF FF FF FF FF FF FF
D0: FF FF FF FF FF FF FF FF FF FF FF FF FF FF FF FF
E0: FF FF FF FF FF FF FF FF FF FF FF FF FF FF FF FF
F0: FF FF FF FF FF FF FF FF FF FF FF FF FF FF FF FF
Then from within u-boot execute the following commands:
mac initialize
mac product_id <PRODUCTID>
mac write_eeprom
Set ProductID to either:
- For 8Gb Models: STAR64V1-2310-D008E000-01234567
- for 4Gb Models: STAR64V1-2310-D004E000-01234567
You can replace the last 8 digits with a random number if you wish. If these commands fail, please join the #star64 channel in the Pine64 community for more assistance.

