Difference between revisions of "PineTime devkit wiring"
Jump to navigation
Jump to search
(Created page with "This article will help you get up to scratch about how to connect your PineTime to your hardware debugger and what to keep in mind. == Raspberry Pi connection == // TODO:") |
|||
| Line 1: | Line 1: | ||
This article will help you get up to scratch about how to connect your PineTime to your hardware debugger and what to keep in mind. | This article will help you get up to scratch about how to connect your PineTime to your hardware debugger and what to keep in mind. | ||
The devkit comes with a set of wires you can use for connecting your programmer to the SWD pins. Most people use friction to make contact with the programming cable, soldering is not recommended if you don't have a temperature-controlled iron and good confidence that you can do it - the thin PCB is fragile and easy to ruin. Current dead PineTime count due to soldering gone wrong is '''3''' (update this number when suitable). | |||
== SWD Pinout == | |||
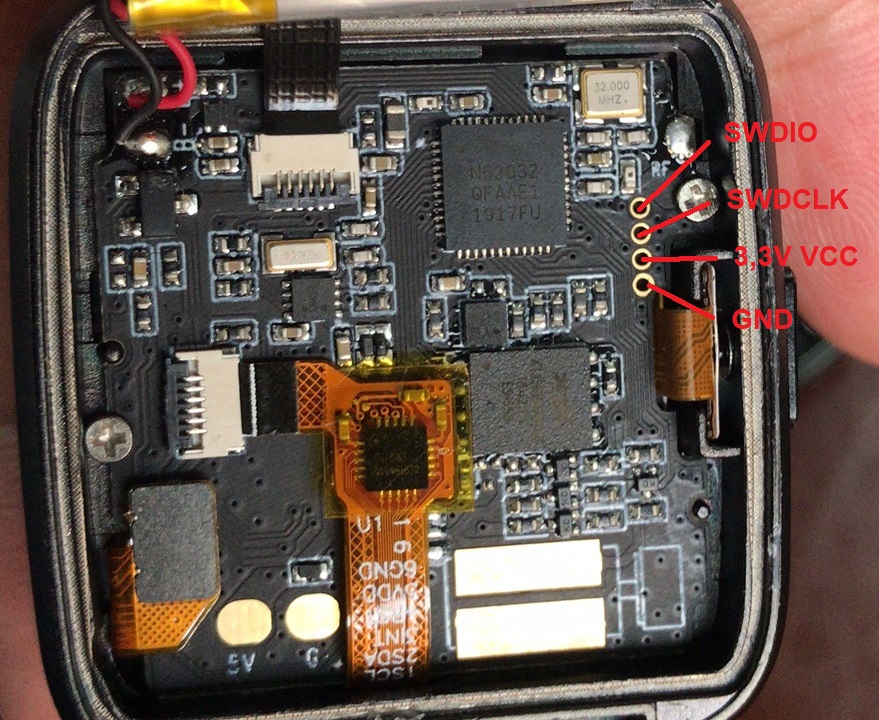
The devkits have exposed SWD pins for flashing and debugging. | |||
The pinout is: | |||
[[File:PineTime_SWD_location.jpg]] | |||
== Raspberry Pi connection == | == Raspberry Pi connection == | ||
// TODO: | // TODO: | ||
Revision as of 13:04, 16 August 2020
This article will help you get up to scratch about how to connect your PineTime to your hardware debugger and what to keep in mind.
The devkit comes with a set of wires you can use for connecting your programmer to the SWD pins. Most people use friction to make contact with the programming cable, soldering is not recommended if you don't have a temperature-controlled iron and good confidence that you can do it - the thin PCB is fragile and easy to ruin. Current dead PineTime count due to soldering gone wrong is 3 (update this number when suitable).
SWD Pinout
The devkits have exposed SWD pins for flashing and debugging.
The pinout is:
Raspberry Pi connection
// TODO:
