Difference between revisions of "PhoenixCard"
Jump to navigation
Jump to search
(Formatting.) |
(added category) |
||
| (One intermediate revision by one other user not shown) | |||
| Line 12: | Line 12: | ||
=== Step to create the SD-Card === | === Step to create the SD-Card === | ||
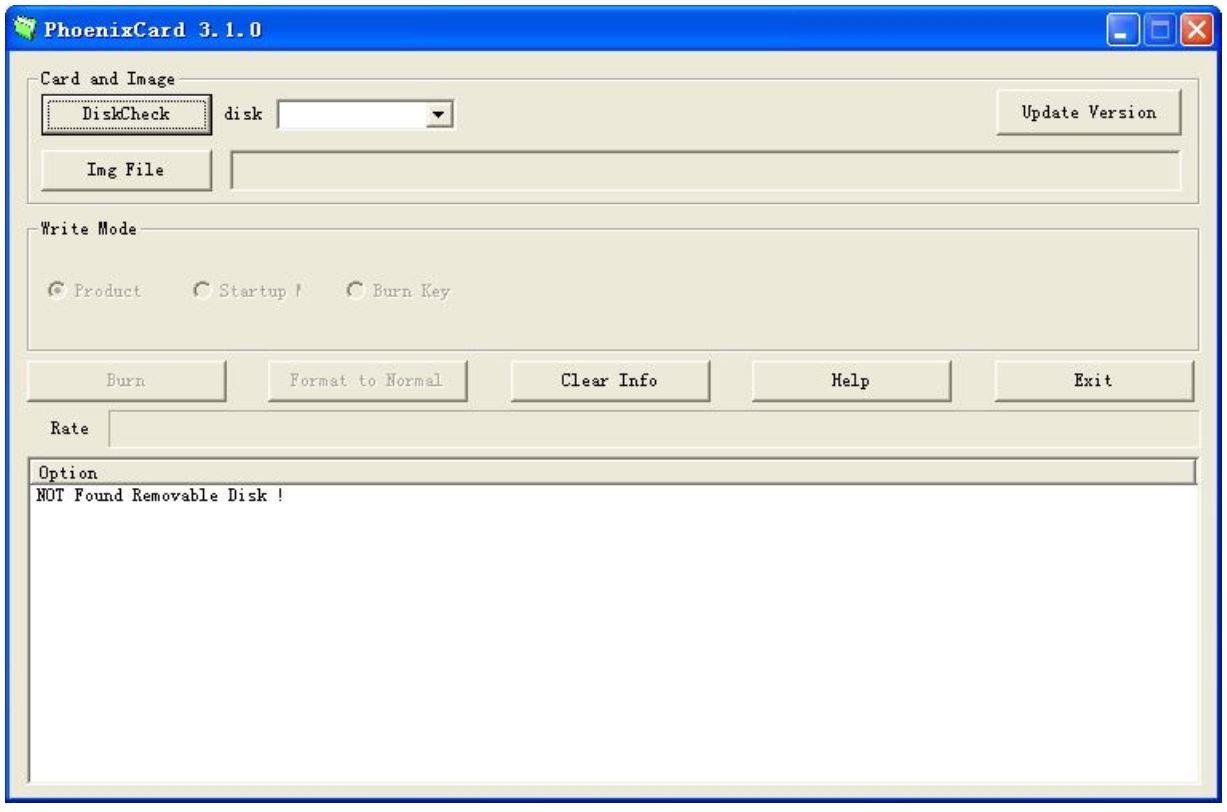
[[File:PCard_Main.jpg| | [[File:PCard_Main.jpg|none|750px|PhoenixCard running on Windows]] | ||
# Extract the PhonixCard-xx.rar file into an empty directory. | # Extract the PhonixCard-xx.rar file into an empty directory. | ||
| Line 33: | Line 33: | ||
* [http://www.androidsoldier.com/2013/11/upgrading-method-android-tablet.html How to upgrade tablet pc with Micro SD Card Tutorial] | * [http://www.androidsoldier.com/2013/11/upgrading-method-android-tablet.html How to upgrade tablet pc with Micro SD Card Tutorial] | ||
* [https://www.youtube.com/watch?v=eKo82AUgbFM PhoenixCard Tutorial YouTube Video] | * [https://www.youtube.com/watch?v=eKo82AUgbFM PhoenixCard Tutorial YouTube Video] | ||
[[Category:Pine A64]] | |||
Revision as of 21:09, 17 October 2020
How to Create MicroSD Card Android Image for Pine A64
What do I need?
- The PhoenixCard software from Allwinner.
- You can download it here
- A firmware image (.img files)
- A SD-Card (best Class 10 with 8GB or more SD-Card) - backup everything first, the Card will be formatted!
- An external SD-Card Reader
- A Windows PC
Step to create the SD-Card

- Extract the PhonixCard-xx.rar file into an empty directory.
- Navigate into the directory where you installed PhoenixCard and start PhoenixCard.exe.
- Click DiskCheck and choose the drive with your SD-Card
- Click Img File and choose the file you want
- Write Mode must be set to Startup
- Press Burn
- Wait until the burning process is finished (you will see the progress in the progress bar and the notification window)
Booting Up the SD-Card
- Insert the SD-Card into the Pine64 and Power-up
- On the first time boot-up, it might take up to 5 minute for the system to get ready
- On the sub-sequence boot-up, it will only take about 40 to 60 second for the system to get ready