Difference between revisions of "Main Page"
| Line 54: | Line 54: | ||
'''Downloading and extracting OS image(s)''' | '''Downloading and extracting OS image(s)''' | ||
You can find all curated OS images [ | You can find all curated OS images [[#Curated Pine A64 (A64+) OS Images]]. | ||
There are two type of Android and Remix images available. Images designated ‘DD’ need to be imaged using Etcher or Win32imager, whilst images labelled ‘Phoenix Card Image’ require the Phoenix Card utility. | There are two type of Android and Remix images available. Images designated ‘DD’ need to be imaged using Etcher or Win32imager, whilst images labelled ‘Phoenix Card Image’ require the Phoenix Card utility. | ||
Revision as of 12:38, 22 November 2016
What You’ll Need to Get Started
You will need the following to get started with using your Pine A64 or A64+ board:
- Windows / Linux PC or MAC with a SD Card Reader connected to the Internet
- Power Supply (PSU) and a micro usb cable. Please make sure to use a PSU rated at +5V @2A and a micro USB cable that is at least 26 AWG thick.
- MicroSD card (8GB or higher capacity) rated 'class 10' or better.
- HDMI cable (unless you wish to run headless/ without a monitor). N.B. Android and Remix OS support 720p and 1080p, while Linux supports a wider range of resolutions.
- Input device(s) such as: keyboard, mouse, remote, pointer, etc,.
Step by Step Instructions
Caution!
Please handle the Pine A64 or A64+ with care. Always hold the board by the edges and make sure to wear an antistatic wrist strap when handling the Pine A64 (+). Touching components on the front and back of the board can result in an ESD discharge that may damage your board. Avoid placing the board on materials such as carpets, plastics or other surfaces prone to electrostatic build-up.
Begin by imaging the OS of your choice
You will require a quality microSD card (8GB or greater; class 10 or faster). There are many substandard and counterfeit cards in circulation and even reputable vendors may unknowingly sell counterfeit microSD cards. Cards that do not meet the criteria outlined above are known to cause a variety of issues including, but not limited to, complete boot failure. There are ways of testing microSD cards prior to installing the operating system to make sure they are appropriate for use with your board. The main utility for checking microSD cards is H2testw 1.4; yet another alternative is F3.
Please refer to the relevant section below for instructions on how to image your microSD card:
Having successfully imaged your microSD card, insert it into the microSD slot located at the bottom left of the board / to the left of the USB 2.0 sockets.
Plug in the HDMI Cable, Ethernet Cable and Peripherals
Unless you are planning on running your Pine A64 (+) headless (without a monitor / as a server), you should plug in all necessary peripherals, including the HDMI and Ethernet cable, prior to powering on the board. Do note, depending on which OS image you are using, some peripherals may or may not work. N.B. Some HDMI→DVI/ VGA converters may not work in conjunction with your monitor or TV.
Apply Power to Your Board
Once you have imaged your microSD and plugged everything in, you are ready to apply power to the Pine A64(+) board. You'll need a good quality 5 Volt, 2 Amp PSU. Using a good quality PSU and micro USB cable is very important as failing to meet the required specifications may prevent the board from booting correctly. A marginally higher PSU Voltage is acceptable (for instance, 5.1 volts - due to the nature of the micro usb connection, a 5.1v supply can help protect slightly against voltage drops which can cause undesirable results). However, a significantly higher voltage of 7 Volts or more will damage the Pine A64(+) board and may render it inoperative.
If you are using a separate micro USB cable with your PSU, make sure that the cable has a low resistance rating. Cables with high resistance will cause improper function and the unit may not boot at all or only partially. The thicker the internal cabling, the better i.e. AWG (American Wire Gauge) 20 is better than AWG 28. In General, power-only microUSB cables come with red colour USB header.
Having completed the steps outlined above the Pine A64(+) board will begin to boot. The red onboard LED light indicates power on status. The LED will not blink during boot up and the colour of the LED stays solid. The colour does not change to signify an error.
Imaging microSD on Windows 7/8/8.1/10
You will need the following utilities to get started with imaging the OS of your choice onto your microSD card:
- A compression Utility (used to unarchive the OS image). We recommend you use 7zip.
- A disk image utility (used to ‘burn’ the .img to your SD card). We recommend you use either the Win32Imager or Etcher utility.
Optional
- Phoenix Card image utility (used ONLY for phoenix card images). You can download it from here.
Downloading and extracting OS image(s)
You can find all curated OS images #Curated Pine A64 (A64+) OS Images. There are two type of Android and Remix images available. Images designated ‘DD’ need to be imaged using Etcher or Win32imager, whilst images labelled ‘Phoenix Card Image’ require the Phoenix Card utility.
Having downloaded the required OS image proceed to use 7zip to unarchive it by right-clicking the archive, and sellecting ‘Extract All’. Upon completion, note the destination of where the .img file was extracted (‘Downloads’ folder by default). Once the process has completed, you can proceed to imaging the .img file.
Imagining the microSD card (DD)
- Insert your microSD card into your laptop/USB card reader. You may require a SD → microSD converter, as most laptops and desktops only feature a full-size SD card reader. Once the microSD card is plugged into your computer, make sure to take note of the drive it has been assigned (the drive is assigned a letter, e.g. ‘F:’). You will need to remember the ‘letter’ it has been assigned when imaging the OS.
- Launch Win32diskImager.exe or etcher.exe. You will be presented with a field titled ‘path’ and a drop down menu labeled ‘device’. Click the ‘path’, navigate to and select the OS image you extracted from the archive earlier. Next, from the drop-down menu select the drive your microSD has been assigned. N.B. Pay close attention to the selected drive (remember your letter) – the imaging process will format the selected drive. If you choose the wrong drive all your data will be lost.
- Having chosen the desired OS image and the correct driver press ‘write’. Once the image has been written to your microSD card you will receive a pop-up notification. Be sure to close the application and to eject/remove your SD card safely from Windows.
Imaging using Phoenix Card
On Windows, you can also use Phoenix Card. The Phoenix Card utility works ONLY with images designated as ‘Phoenix Card’ in the downloads section. To use Phoenix Card follow these steps:
- Insert your microSD card into your laptop/USB card reader. You may require a SD → microSD converter, as most laptops and desktops only feature a full-size SD card reader. Once the microSD card is plugged into your computer, make sure to take note of the drive it has been assigned (the drive is assigned a letter, e.g. ‘F:’). You will need to remember the ‘letter’ it has been assigned when imaging the OS.
- Launch phoenixcard.exe. You will be presented with a ‘disk’ drop-down menu and a field denoted as ‘Img File’. Click on ‘Img File’ and navigate to and select the OS image have downloaded and unarchived. Next, make sure to select the disk that your microSD card has been assigned. N.B. Pay close attention to the selected drive (remember your letter) – the imaging process will format the selected drive. If you choose the wrong drive all your data will be lost.
- Make sure to select ‘Startup!’ from the ‘Write mode’ window and click Burn. Once the image has been written to your microSD card you will receive a confirmation in the ‘option’ window. Be sure to close the application and to eject/remove your SD card safely from Windows.
Imaging microSD on Apple OSX
You will need the following utilities to get started with imaging the OS of your choice onto your microSD card:
- A compression Utility (used to unarchive the OS image). We recommend you use 7Zip.
- A disk image utility (used to ‘burn’ the .img to your SD card in GUI). We recommend you use ApplePi Baker or Etcher.
N.B. Phoenix Card utility and images are NOT available on Apple OSX.
Downloading and extracting OS image(s)
You can find all curated OS images here. On OSX you can only use images designated as ‘DD’.
Having downloaded the required OS image proceed to use 7zip to unarchive it by double clicking the archive, and selecting ‘Extract All’. Upon completion, note the destination where the .img file was extracted (‘Downloads’ folder by default). Once the process has completed, you can proceed to imaging the .img file.
Imagining the microSD card (GUI)
- Insert your microSD card into your Mac laptop/USB card reader. You may require a SD → microSD converter, as Apple’s laptops and desktops only feature a full-size SD card reader. Once the microSD card is plugged into your computer it should appear in Finder / on your desktop.
- Launch Apple-Pi Baker or the etcher utility. Upon startup the application it will ask for your password. When the application launches you will be presented with a field titled ‘IMG file’ and a path of the mounted microSD card (it will look something like this: ‘/dev/diskX 32.0Gb SD card’). Click the ‘IMG file’ button, navigate to and select the OS image you extracted from the archive earlier. Next, select the microSD from the window. N.B. Pay close attention to the selected drive – the imaging process will format the selected drive. If you choose the wrong drive all your data will be lost.
- Having chosen the desired OS image and the correct driver press ‘Restore Backup’. Once the image has been written to your microSD card you will receive a pop-up notification. Be sure to close the application and to eject/remove your SD card safely from your Mac.
Imaging from Terminal
N.B. If you are not comfortable using the terminal, please use the GUI method outlined above instead.
- Insert your microSD card into your Mac laptop/USB card reader. You may require a SD → microSD converter, as Apple’s laptops and desktops only feature a full-size SD card reader. Once the microSD card is plugged into your computer it should appear in Finder / on your desktop.
- Open up your terminal and navigate to the directory where you unarchived your OS image.
- Before you start writing to the card, you will have to identify your microSD card. Type: diskutil list and note the output. The disk number should match the size of your SD card and will likely be using ‘Fdisk_partition_scheme’. Having identified the disk number execute the following commands (substitute diskX for your disk and name of image for pine64-image-name.img):
diskutil unmountDisk /dev/diskX sudo dd if=pine64-image-name.img of=/dev/disk2 bs=1M
- Wait patiently for the process to complete. Be sure to eject/remove your SD card safely from your Mac.
Troubleshooting
There is a number of things that can prevent the Pine A64(+) board from booting up properly. The most common culprits of a failed boot are (to find out more click here):
- Subpar or counterfeit microSD card
- Subpar Power Supply
- High resistance (thin) or a very long microUSB cable
- Failed imaging of the microSD card (refer to the respective ‘imaging microSD card section)
Make sure to have the newest version of the OS image your are running. On Linux, you can update the kernel and uboot using scripts located in the following directory: /usr/local/sbin
To navigate to the directory type (in terminal): cd /usr/local/sbin
You list all the available scripts by typing (in terminal): ls
To run the script required update script run the following command: sudo ./update_script.sh (substitute the relevant update script for update_script)
Supported Screen Resolutions
The pine supports a number of video resolutions under Linux, however RemixOS and Android images currently only support 720p and 1080p. Linux supports a wider range of resolutions (see all resolutions supported on Linux here). If the native resolution of your monitor or TV is not compatible with the Pine A64(+) then you will be unable to get a video to work with your screen.
Troubleshooting Step by Step
Follow these steps to determine the cause of your problem:
- Check your PSU and microUSB cable ratings
- Download and image a base image of Linux
- Plug in Power and Ethernet into your Board
- Watch Ethernet port LED activity
- Check your router for Pine A64(+) IP
- Attempt to ssh into the Pine A64(+) from your computer
If your PSU and microUSB meet the criteria, and you have correctly followed the instructions to image your card and power on the board, but you are not seeing any LED activity and cannot ssh into your Pine A64(+) then either the imaging process failed (possibly due to a subpar microSD) OR the PSU / microUSB cable is/are faulty.
If your PSU and microUSB meet the criteria, and you have correctly imaged the OS to your card and power on the board and your can ssh into your Pine A64(+) but get no video feed, then it's likely that the native resolution of your monitor/TV is not supported.
If neither of the abovementioned scenarios fits the problem you are facing please consult this thread (thanks to Ghost for compiling the list): http://forum.pine64.org/showthread.php?tid=680
If you cannot find a solution to your problem you can submit a ticket at: https://support.pine64.org/
Curated Pine A64 (A64+) OS Images
- Using 8GB class 10 microSD card
- Setup Steps:
- Download the preferred OS image from below OS links and extract the img file from the archive using 7-Zip
- Use Etcher (Linux/Windows/Mac), Win32 Disk Imager or Linux dd command to write the img to a SD card
- Insert the SD card into Pine A64 board and boot it up
- Debian Linux Jessie with Mate GUI Image [20160701] by lenny.raposo with Longsleep kernel
- DD image (for 8GB and above SD Card):
- Lenny's Debian Support thread on Pine64 forum
- Direct download from pine64.org
- Torrent Download
- MD5 (Zip file): 2356BC9C50AADEF2CFB9D7BEAA23B35A
- File Size: 1.70GB
- Up to date on longsleep uboot, kernel and fixes
- Suitable for 512MB/1GB/2GB PineA64 Board
- Login with
- username: debian
- password: debian
- Execute resize_rootfs.sh script to resize the root partition in order to fully utilize the SD Card
- DD image (for 8GB and above SD Card):
- Ubuntu Linux Image [20160530] based on Longsleep build, updated by Pine64
- Thanks to longsleep works, the Linux build progress rapidly, This is a build based on longsleep works and may not have all bell and whistles from longsleep and Sunxi community. For latest build, you can create one and following this thread
- Suitable for 1GB/2GB Pine A64+ Board, not suitable for 512MB Pine A64 Board due to system memory constrain
- DD image (for 8GB and above SD Card):
- Direct download from pine64.org
- MD5 (Zip file) : 261E440C324BAAC3B74CDB326DE98A20
- File Size: 2.37GB
- Included Mate Desktop, Firebox Browser, Thunderbird Email, and LibreOffice Suite.
- Login with
- username: ubuntu
- password: ubuntu
- Execute resize_rootfs.sh script to resize the root partition in order to fully utilize the SD Card
- Android 5.1.1 Image Release 20160711 [v1.2.6]
File:Logo android lollipop.jpg
- The Android build suitable for 1GB/2GB Pine A64+ Board, not advise to run on 512MB Pine A64 Board due to system memory constraint
- Rootable build, online update (OTA) only work when the build still not root.
- Set default HDMI output to 720P, video setting supports both 720P and 1080P
- Add Ethernet Network setting.
- Update GMS software package to 5.1r4
- Set UVC USB camera as front camera and 5M Pixel camera module as real camera
- DD images:
- For 8GB microSD Card
- Direct download from pine64.org
- Torrent Download
- MD5 (Zip file): 974C60C618A2F65657DDE9B1798812AB
- File Size: 646MB
- For 16GB microSD Card
- Direct download from pine64.org
- Torrent Download
- MD5 (Zip file): FAA48E4261451C1F54094AB6C253E76C
- File Size: 655MB
- For 32GB microSD Card
- Direct download from pine64.org
- Torrent Download
- MD5 (Zip file): D46671B0FCE1B3572103E2615A494C78
- File Size: 682MB
- For 64GB microSD Card
- Direct download from pine64.org
- Torrent Download
- MD5 (Zip file): C7453B4E84B145ED46FA927702FB97A3
- File Size: 707MB
- For 8GB microSD Card
- Remix OS 2.0 Image Release 20160718

- Suitable for 2GB Pine A64+ Board, can runs on 1GB Pine A64+ Board with performance lagging, not suitable for 512MB Pine A64 Board
- Add Remix apps market
- Video setting supports both 720P and 1080P
- Supports video screen scaling function
- New MAC address assignment method, tags to board and SoC unique ID.
- Support UVC USB camera as front camera
- Known issues:
- Not yet support 5M Pixel camera module as real camera
- Even the HDMI output can set to 720P, but during boot up time, the boot logo stil maintain as 1080P.
- DD image (for 8GB microSD Card):
- Direct download from pine64.org
- Torrent download
- MD5 (Zip file): AE2256F46FAB2C9F8B9556FCB5995B3B
- File Size: 997MB
- DD image (for 16GB microSD Card):
- Direct download from pine64.org
- Torrent download
- MD5 (Zip file): 71587B7F7D86F39CD0874800C0491EA0
- File Size: 1.02GB
- DD image (for 16GB microSD Card):
- DD image (for 32GB microSD Card):
- Direct download from pine64.org
- Torrent download
- MD5 (Zip file): 0DAEC86248A7448B8D4F41B4DAEB9D6B
- File Size: 1.05GB
- DD image (for 32GB microSD Card):
- DD image (for 64GB microSD Card):
- Direct download from pine64.org
- Torrent download
- MD5 (Zip file): 6578237CB249DDE5A86A6D06D6793804
- File Size: 1.08GB
- DD image (for 64GB microSD Card):
Accessories Step by Step Guides
Wifi/Bluetooth module:
Acrylic Open Enclosure:
7" LCD Touch Screen Panel:
Real Time Clock (RTC) battery holder (AAA battery type):
Real Time Clock (RTC) battery holder (CR-2032 Coin Cell battery type):
SoC Specification
- Based on Allwinner A64

CPU Architecture
- Quad-core ARM Cortex-A53 Processor@1152Mhz
- A power-efficient ARM v8 architecture
- 64 and 32bit execution states for scalable high performance
- Support NEON Advanced SIMD (Single Instruction Multiple Data) instruction for acceleration of media and signal processing function
- Support Large Physical Address Extensions(LPAE)
- VFPv4 Floating Point Unit
- 32KB L1 Instruction cache and 32KB L1 Data cache
- 512KB L2 cache
GPU Architecture
- ARM Mali400MP2 Dual-core GPU
- Support OpenGL ES 2.0 and OpenVG 1.1 standard
System Memory
- Main Memory Option: 512KB, 1GB and 2GB.
- Storage Memory: No build in Flash memory, fully base on bootable microSD Card or USB attached storage.
Board Features
Video
- HDMI 1.4a (Type A - full)
Audio
- 3.5mm stereo earphone/microphone plug
Network
- 10/100/1000Mbps Ethernet(Pine A64+ version), 10/100Mbps Ethernet(Pine A64 version)
- WiFi 802.11 b/g/n with Bluetooth 4.0 (optional)
Storage
- microSD - bootable, support SDHC and SDXC, storage up to 256GB
- USB - 2 USB2.0 Host port
Expansion Ports
- DSI - Display Serial Interface, 4 lanes MiPi, up to 1080P
- CSI - CMOS Camera Interface up to 5 mega pixel
- TP - Touch Panel Port, SPI with interrupt
- RTC - Real Time Clock Battery Connector
- VBAT - Lithium Battery Connector with temperature sensor input
- Wifi/BT Module Header - SDIO 3.0 and UART
- 2x20 pins "Pi2" GPIO Header
- 2x17 pins "Euler" GPIO Header
- 2x5 pins "EXP" Console Header
Power Usage
- Input Power: DC 5V @ 2A, 3.7V Li-Ion battery connector, microUSB connector, Euler connector
- Power Consumption: 2.5W
Software/Image Download
Board Dimension
- 133mm x 80mm x 19mm
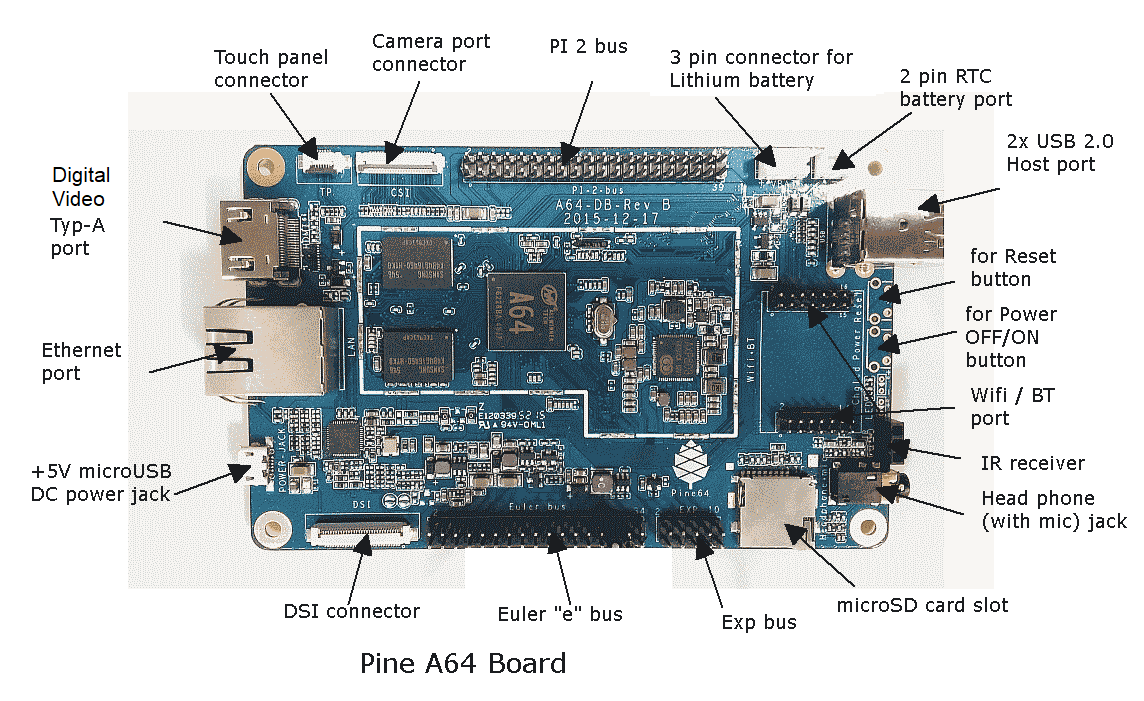
Pine A64 Board information
- Pine A64 Connector Layout @courtesy of norm24
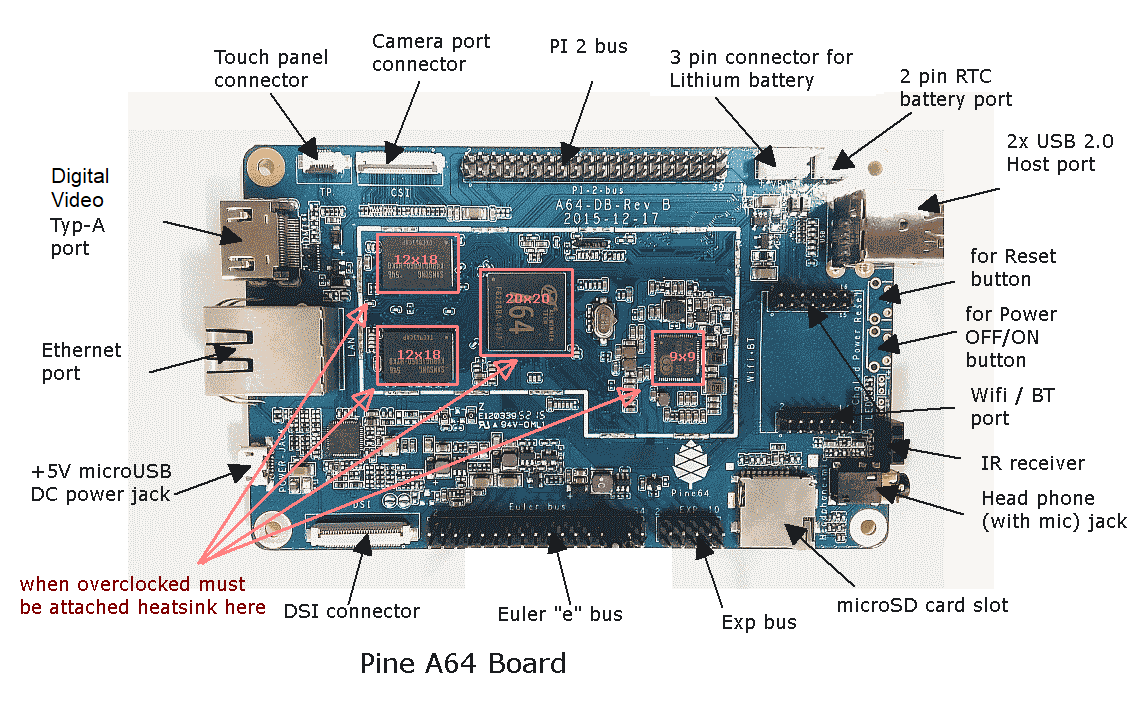
- Pine A64 Heat Sink Location @courtesy of norm24
- Pine A64 Connector List
- Pine A64 Pi-2/Eular/Ext Bus/Wifi Bus Connector Pin Assignment (Updated 15/Feb/2016)
- Pine A64 PCB dimension
- Board Model Comparison
- Pine A64 Board Schematic:
Datasheet
- Allwinner A64 SoC information:
- X-Powers AXP803 PMU (Power Management Unit) information:
- 5MPixel CMOS Camera module information:
- LCD Touch Screen Panel information:
- Lithium Battery information:
- Ethernet PHY information:
- Wifi/BT module information:
- Enclosure information:
- Connector information:
Pine A64 POT
Related Information
Other Resources in the Net
- Linux Sunxi Wiki page on Pine A64
- Collection of scripts to set up a minimal Ubuntu 14.04.3 / Debian 8 Jessie root filesystem Contributed By Uli Middelberg
- Linux Image created by Andre Przywara
- Pine A64 with HypriotOS by Dieter and Govinda
- H2testw 1.4 – Gold Standard In Detecting USB Counterfeit Drives
- F3 - an alternative to h2testw
- Benchmarking The Low-Cost PINE 64+ ARM Single Board Computer by Michael Larabel
- Pine64 Linux build scripts, tools and instructions by Longsleep
- Pine64 Linux image by Longsleep
- A series of Youtube video on PineA64 Developers Board by Michael Larson
- Pine64 Quick Start Guide (with Gotchas)
- Shrinking images on Linux by FrozenCow