Difference between revisions of "PinePhone (Pro) Keyboard"
(→Safety) |
|||
| Line 50: | Line 50: | ||
== Safety == | == Safety == | ||
{{warning|1=Do NOT plug any device into the phone USB-C port while the keyboard is attached. Doing so may result in damage or loss of the keyboard charging functionality. Technical details can be found in [https://www.pine64.org/2022/05/31/may-update-worth-the-wait/ this] blog post. <br><br> | {{warning|1=Do NOT plug any device into the phone USB-C port while the keyboard is attached. Doing so may result in damage or loss of the keyboard charging functionality. Technical details regarding the issue can be found in [https://www.pine64.org/2022/05/31/may-update-worth-the-wait/ this] blog post. <br><br> | ||
Due to this limitation users may want block the USB-C port of the phone while the keyboard is connected to prevent connecting any USB device to the phone under any circumstances. See for example [https://fosstodon.org/web/@silverhax/107783280758831068 here].}} | Due to this limitation users may want block the USB-C port of the phone while the keyboard is connected to prevent connecting any USB device to the phone under any circumstances. See for example [https://fosstodon.org/web/@silverhax/107783280758831068 here].}} | ||
Revision as of 23:50, 31 May 2022
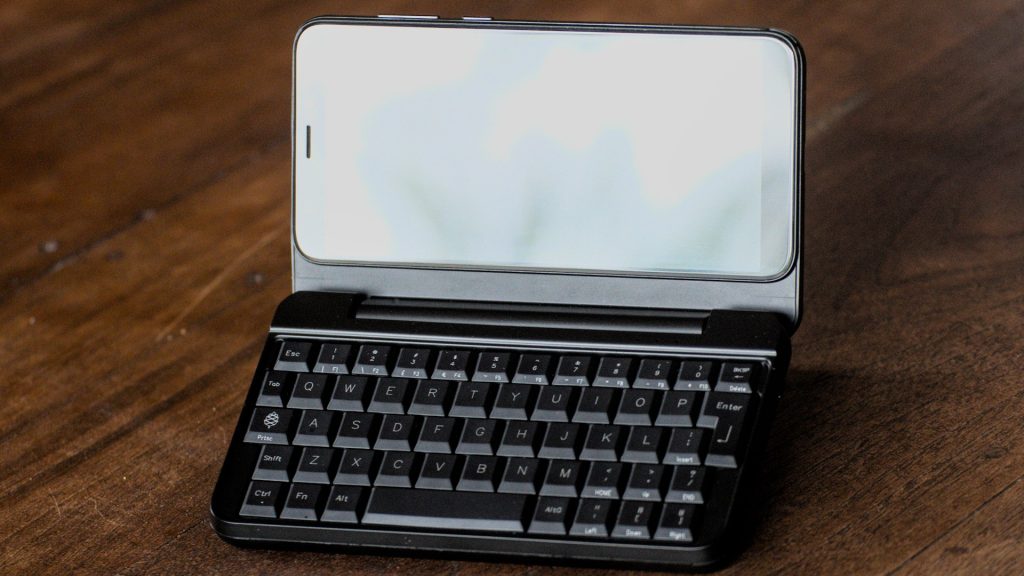
The PinePhone (Pro) Keyboard Case is a case compatible with the PinePhone and PinePhone Pro, adding a keyboard functionality to the phone. It features a clam-shell design and uses the pogo pins located on the smartphone’s midsection and attaches by replacing the default back cover. This add-on effectively turns the PinePhone (Pro) into a PDA with an in-built LTE modem.
Getting started
The keyboard case works with both the PinePhone and PinePhone Pro and features a clam-shell design. It uses pogo pins located on the phone’s midsection and attaches by replacing the default back cover. When folded, the phone’s screen and the keyboard rest securely against each other. The hinge features a 180° design, which not only allows for two-hand typing on a surface but also for comfortable thumb-typing when fully extended. The etched keycaps can be easily relocated for alternate layouts such as AZERTY or QWERTZ. The keyboard case runs an open firmware, which means that anyone with the know-how can alter existing functions or add new ones. The bottom (keyboard) and top (phone) sections of the assembly are well-balanced thanks to the large, 6000mAh, internal battery capable of charging the PinePhone (Pro) during operation. The internal battery effectively triples the phone’s battery life. The internal keyboard battery can be manually toggled on/off and the keyboard’s battery charge level can be read in the supported OSes; the keyboard remains functional with the battery fully depleted.
You do not lose access to the PinePhone (Pro)’s USB-C port, speaker, microphone, or any external features, such as volume and lock buttons, with the keyboard attached. There is also a cut-out for the camera, torch, and headphone jack. The USB-C port on the keyboard is capable of powering both the keyboard and PinePhone (Pro) simultaneously. This means that you can plug in a USB mouse, a USB-C dongle, or some other peripheral while the phone and keyboard’s internal battery charge.
Please keep in mind that the keyboard case transforms the PinePhone (Pro) into a PDA, which means that taking calls will likely prove awkward without a wired or wireless headset connected.
Mounting the keyboard
Power off your PinePhone and remove the back case. To remove the back case of the PinePhone use your fingernail or another soft object to pry up the back case. A notch to easily remove the cover is located at the bottom left of the PinePhone with the backcover facing the user.
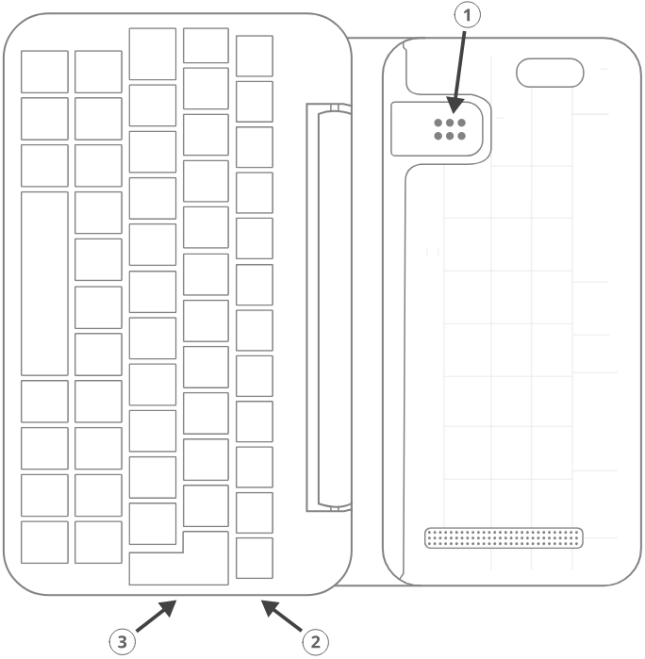
Open and place the keyboard flat on a hard surface with the hinge fully extended. Proceed to insert the PinePhone into the keyboard at an angle of approx. 15 degrees. Make sure that the PinePhone’s pogo pins and the corresponding pads ① on the keyboard are aligned. The leading edge with volume and power buttons should make contact first. Firmly press the PinePhone into place. Multiple clicks should be heard as the two snap into place. Pay special attention to the plastic pin below the camera hole. Firmly push from the rear, below the camera hole, to click it into position. Failing to do so may cause an insufficient pin contact and prevent the case from charging the phone.
The PinePhone can be removed from the keyboard easily using a notch similar to the one found on the back case. The notch is located at the bottom of the leading edge with the power and volume buttons.
Operation
The keyboard will function automatically once a PinePhone running a compatible operating system is mounted. For alterations to physical layout and firmware see the relevant sections respectively.
The keyboard features an in-built 6000mAh battery. The battery can be turned ON/OFF using the button on the right leading edge of the keyboard ②. A short button press activates the internal battery while a long (15 seconds) press or double press deactivates it. Compatible operating systems display both the PinePhone’s and keyboard’s battery status.
You should charge the PinePhone and the keyboard only using the USB-C ③ port on the keyboard. The keyboard’s USB-C port cannot be used for peripherals. The PinePhone’s USB-C port remains operational when mounted in the keyboard and can be used for data and peripherals.
Troubleshooting
There are multiple possible hardware issues users could face. It is recommend to check the following most common hardware issues and their solutions and workarounds.
Pogo pins not making proper contact
Under certain scenarios the keyboard's contacts are not making proper contact with the pogo pins of the phone. To address the issue:
- Power down the phone!
- Apply slight pressure in the upper mid of the PinePhone's backside until the plastic holder pin towards the upper middle of the keyboard cover, until an audible click can be heard.
- Make sure the contacts and pogo pins are clean and the pogo pins can be slightly pressed individually.
- If the above does not work, a shim under the keyboard's contacts might be required, as explained FAQ troubleshooting section. See also this photo of where to place the shim, or this video.
Top row is less responsive
The keys of the top row may be less responsive. The issue can be worked around by adding inserts to the underside of the top row key caps to decrease the travel distance. More details regarding the workaround can be found in the corresponding section of the FAQ page of the developer megi: https://xnux.eu/pinephone-keyboard/faq.html#ts
Software issues
For any software issue please see the Software support section and the FAQ section.
Safety
Due to this limitation users may want block the USB-C port of the phone while the keyboard is connected to prevent connecting any USB device to the phone under any circumstances. See for example here.
Please note: Only use mild isopropyl alcohol when wiping down the clamshell of the device. Stronger solutions may partially strip the coatings. Do not lube the keyboard with GPL 205G0 switch grease, it can cause problems with the key responsiveness and tactility.
Software support
Kernel-space driver
Kernel driver implementation from Samuel Holland: ip5xxx_power and kb151 https://github.com/smaeul/linux/commits/wip/pp-keyboard
User-space driver
The user-space driver is available here. Use git to clone the repository. You're going to need sdcc 4.1+ installed to build it, so use your package manager to install that first. Next you'll cd into the directory you cloned pinephone-keyboard and use the command "make" to build. After the build is completed, cd into the build directory and you'll notice several new files starting with ppkb-. To use your keyboard case, you'll want to run the following command: sudo ./ppkb-i2c-inputd Open something you can type into like a new terminal window or text editor and you should now be able to use the keyboard case!
Notes
Virtual keyboards such as squeekboard are opening whenever a text field is selected.
To disable this behavior under Linux running Phosh you can change the corresponding settings under Settings > Accessibility > Screen Keyboard (see here). The virtual keyboard can also be disabled temporarily for one session using:
- To temporarily disable the virtual keyboard:
gsettings set org.gnome.desktop.a11y.applications screen-keyboard-enabled false
- To temporarily enable the virtual keyboard:
gsettings set org.gnome.desktop.a11y.applications screen-keyboard-enabled true
The virtual keyboard needs to be activated before removing the keyboard case again.
Under Plasma Mobile the keyboard can be disabled via a widget, see here.
In Sxmo disabling the keyboard is not required, as the keyboard will only shown when the corresponding hotkey button is pressed.
Keyboard layout
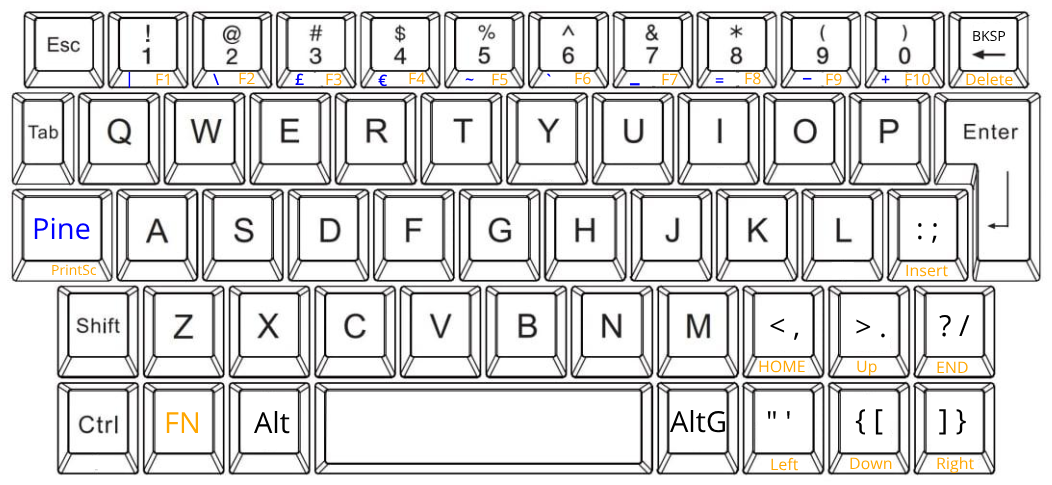
The keyboard features a default layout (pictured below) created and agreed upon by the community. The keyboard layout can be altered using software as well as by physically repositioning keycaps. All keycaps, with the exception of space and return keys, can be easily and safely relocated for alternative layouts corresponding to software settings.
Keyboard firmware
PinePhone’s keyboard firmware was developed independently by Ondřej Jirman as a free-of-charge contribution to PINE64. The firmware source code is freely and publicly available and you can modify it, and the supporting utilities, using common FOSS tools.
Firmware and supporting utilities
The design of the firmware allows the keys, modifier keys, and their combinations to be handled in virtually unlimited ways, without a need to flash a customized version of the firmware. Mapping of keys is defined at runtime, using the supporting utilities, and is not hardcoded in the firmware. Different keyboard layouts can be loaded dynamically to support various use cases.
The repository that contains the source code of the firmware, supporting utilities and associated documentation is located at https://xnux.eu/pinephone-keyboard/.
You are welcome to contribute patches and improvements to the firmware and the supporting utilities. A summary of firmware development history is available at https://xnux.eu/log/ alongside other development updates from the firmware author.
Much time and effort went into the development of this firmware. If you wish to send a token of appreciation or support the development efforts in any way, please consider making a donation to the author via one of the methods listed at the bottom of this web page: https://xnux.eu/contribute.html.
Firmware License
Copyright (C) 2021 Ondřej Jirman <megi@xff.cz>
This program is free software: you can redistribute it and/or modify it under the terms of the GNU General Public License as published by the Free Software Foundation, with either version 3 of the License or (at your discretion) any later version.
This program is distributed in the hope that it will be useful, but WITHOUT ANY WARRANTY; without even the implied warranty of MERCHANTABILITY or FITNESS FOR A PARTICULAR PURPOSE. See GNU General Public License for more details.
GNU General Public License http://www.gnu.org/licenses/
Hardware
Key hardware specifications:
- Dimensions (closed): 161 x 95 x 25mm
- Weights (without / with PinePhone mounted): ~ 191 / ~391 grams
- Number of keys: 54
- Number of rows: 5
- Keyboard IC: Keyboard IC: EM85F684A 8-bit microcontroller with 256 bytes RAM, 2048/ bytes XRAM; 16kB for user’s own firmware
- Battery capacity: 6000mAh (22.2Wh 3.7V)
- Charger input: 5V, 3A (15W)
- Charging and battery IC chip: IP5209 power management IC with charge indicate controller and boost converter
Frequently asked questions
Please help to review and edit this page or section. Information are subject to change.
The keyboard does not work under OSK-SDL (full-disk encryption UI at boot)
That is a known bug, see https://gitlab.com/postmarketOS/pmaports/-/issues/1383.
What is the keyboard driver situation?
See https://xnux.eu/pinephone-keyboard/faq.html#drivers
Are keyboard drivers included in my distribution?
See https://xnux.eu/pinephone-keyboard/faq.html#distros
What's the status of the existing software for the keyboard?
See https://xnux.eu/pinephone-keyboard/faq.html#sw-status
My keyboard doesn't work (well)!
See https://xnux.eu/pinephone-keyboard/faq.html#faq-ts
How does charging work?
See https://xnux.eu/pinephone-keyboard/faq.html#charging
What charger is best for the keyboard?
See https://xnux.eu/pinephone-keyboard/faq.html#chargers
How safe is the charger circuit in the keyboard?
See https://xnux.eu/pinephone-keyboard/faq.html#safety
Keyboard doesn't react to any key presses
See https://xnux.eu/pinephone-keyboard/faq.html#ts
Keyboard works but top row of keys is less responsive
See https://xnux.eu/pinephone-keyboard/faq.html#ts
Phone is not charging from the keyboard
See https://xnux.eu/pinephone-keyboard/faq.html#ts
Phone is charging slowly from the keyboard battery
See https://xnux.eu/pinephone-keyboard/faq.html#ts
Can you open the keyboard and add extra functionality?
It is possible to do so, however the production units can be extremely difficult to open. Do not attempt to open the keyboard if you do not want to risk cosmetic damage (scaring and scratching of the plastic).
How can I rotate the screen display in tty ?
Under Linux this can be done using the command echo 1 | sudo tee /sys/class/graphics/fbcon/rotate
Top row stopped displaying symbols! (kernel > 5.17)
- For Phosh (at the example of Mobian) see: https://wiki.mobian-project.org/doku.php?id=ppaccessories
- For TTY and SWMO see: https://codeberg.org/HazardChem/PinePhone_Keyboard
Documents
- PinePhone Keyboard 4 language user manual ver 2.0 in PDF format
- PinePhone Keyboard 4 language user manual ver 2.0 in ODT format
Schematics, Datasheet and certifications
- Datasheet:
External links
- Pre-order announcement
- FAQ of the developer megous: https://xnux.eu/pinephone-keyboard/faq.html


